Imagine asking ChatGPT or Claude AI to create a complete landing page on your WordPress site, upload images, set up products, and manage your entire website—all through simple conversation. This isn’t science fiction anymore. Thanks to the Model Context Protocol (MCP), your AI assistant can now directly control your WordPress site like a skilled developer working 24/7.
I’ve been testing this integration for the past few months on my own WordPress sites, and the results have been remarkable. What used to take hours of manual work now happens in minutes through natural conversation. Let me walk you through exactly how to set this up and share some real-world examples that will blow your mind.
What is MCP and Why Does It Matter for WordPress?
The Model Context Protocol is an open standard that creates a secure bridge between AI models and external systems. Think of it as giving your AI assistant hands to actually touch and modify your website, rather than just talking about what needs to be done.
For WordPress users, this means you can:
- Create and publish content by describing what you want
- Generate AI images and automatically set them as featured images
- Build complete product pages for WooCommerce stores
- Manage users, categories, and site settings through conversation
- Handle bulk content operations without touching the dashboard
The game-changer here is that you’re not just getting suggestions—the AI is actually doing the work for you.
Prerequisites: What You’ll Need
Before we dive into the setup, here’s what you need to have ready:
For Claude AI Integration:
- A WordPress website with admin access
- Valid SSL certificate (HTTPS required)
- Claude AI account (works with free tier)
- AIWU plugin installed
For ChatGPT Integration:
- Everything above, plus
- ChatGPT Pro subscription ($20/month)
- Access to Developer Mode (currently in beta)
Technical Requirements: Your WordPress site must be publicly accessible (no localhost development sites). If you’re using Cloudflare or NGINX caching, you’ll need to disable it for the MCP endpoint—don’t worry, I’ll show you exactly how.
Step 1: Installing and Configuring the AIWU Plugin
The AIWU plugin is your gateway to MCP integration. Here’s how to get it running:
Download and Install
You can grab the free version directly from the WordPress repository or download it from the AIWU website. The WordPress MCP integration is included even in the free tier, which is pretty generous.
Once installed, navigate to the AIWU settings in your WordPress admin. You’ll see a dedicated MCP section that looks intimidating at first, but it’s actually straightforward.
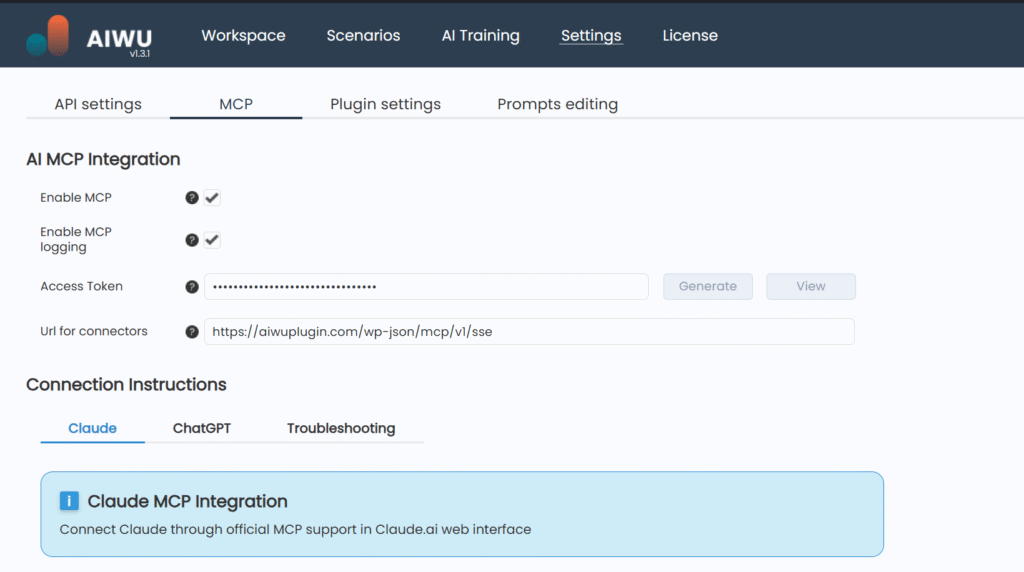
Generate Your Access Token
In the MCP settings, click “Generate New Token.” This creates a unique 32-character string that authenticates your AI connections. Think of this as a super-secure password that only your AI assistants know.
Configure Your Endpoints
The plugin automatically generates your MCP endpoints. For most sites, you’ll use:
Basic: https://yoursite.com/wp-json/mcp/v1/sse
With Token: https://yoursite.com/wp-json/mcp/v1/sse?token=YOUR_TOKEN_HERE
Always use the token version for security. I learned this the hard way during my initial testing when I left authentication open—not a good idea!
Step 2: Connecting Claude AI to WordPress
Now that you have your access token ready, connecting Claude to your WordPress site is surprisingly straightforward. The entire process takes about 2 minutes and works with both the free Claude web interface and Claude desktop app.
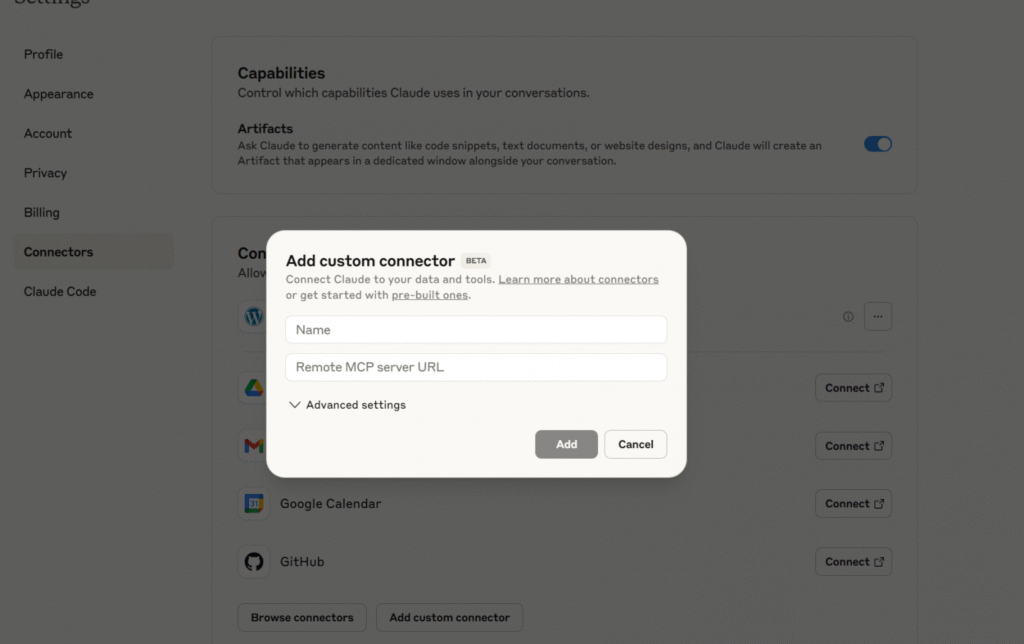
Adding Your WordPress Site to Claude
Head over to Claude.ai and navigate to Settings → Connectors. Click Add custom connector and you’ll see a simple form asking for your MCP endpoint.
Here’s where you’ll paste your WordPress MCP URL with your security token:
https://yoursite.com/wp-json/mcp/v1/sse?token=your-access-token-here
Replace your-access-token-here with the 32-character token you generated in the previous step.
Configuring Tool Permissions
Once Claude successfully connects to your site, you’ll want to configure which tools it can access. In Claude.ai, find your connected MCP server and click Tools and settings.
This is where you can enable or disable specific WordPress functions. For your first setup, I recommend starting with basic content management tools:
- Post creation and editing
- Media management
- Basic taxonomy operations
You can always expand permissions later as you become more comfortable with the system.
For detailed technical documentation and troubleshooting, refer to the official AIWU Claude MCP integration guide.
Step 3: Connecting ChatGPT to WordPress
ChatGPT’s setup is slightly more complex because it requires Developer Mode, but the results are worth it.
Enabling Developer Mode
In your ChatGPT Pro account, navigate to Settings >Connectors -> Additional Settings and enable “Developer Mode.” This feature is still in beta, so expect occasional changes to the interface.
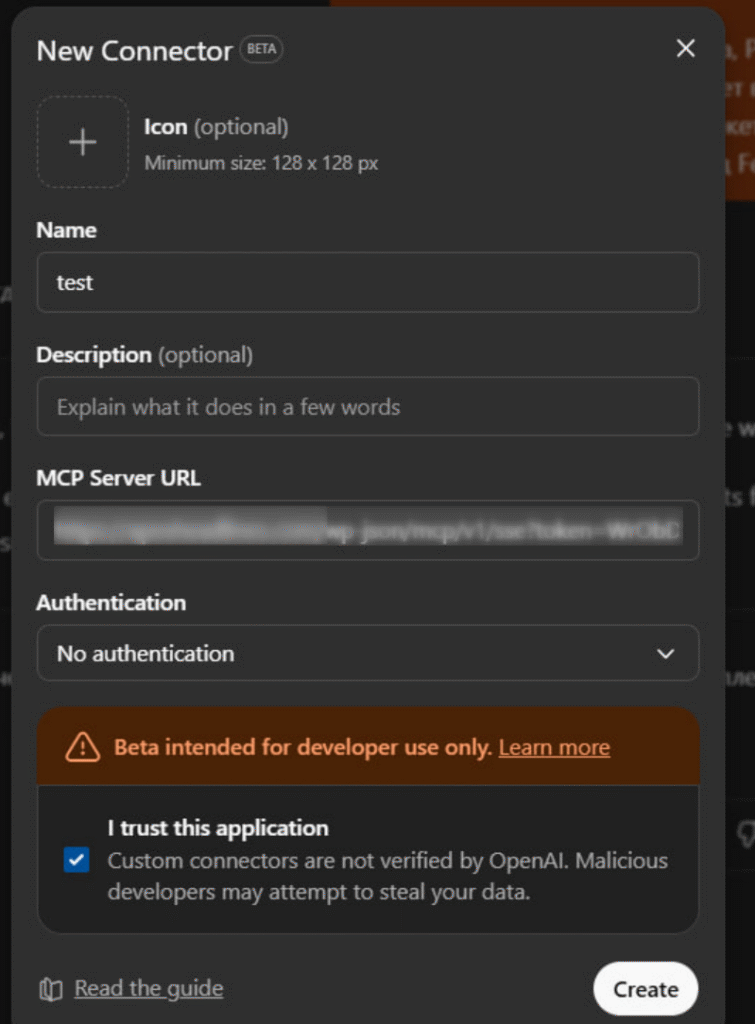
Creating a Custom Connector
With Developer Mode active, you can create custom connectors. Click “New Connector” and configure:
- Name: WordPress MCP
- Description: Direct WordPress management via MCP
- Authentication: No Authentication (we’re using URL token)
- MCP Server URL: Your token-secured MCP URL
For detailed technical documentation and troubleshooting, refer to the official AIWU Claude MCP integration guide.
AIWU Plugin MCP Features & Capabilities (September 2025)
The technical specifications are one thing, but let’s talk about what this actually means for your daily WordPress workflow. With 40+ MCP functions at your disposal, you can literally run your entire WordPress site through conversation. Here are some real-world scenarios that showcase the true power of this integration.
Core WordPress Management Functions
| Feature Category | Function | Description | Key Parameters |
|---|---|---|---|
| System Health | mcp_ping | Connectivity check, returns GMT time and site name | None |
| Plugin Management | wp_list_plugins | List all installed plugins with name and version | None |
User Management
| Function | Description | Required Parameters | Optional Parameters |
|---|---|---|---|
wp_get_users | Retrieve user list (default: 10 users) | None | limit, paged, offset |
wp_create_user | Create new user account | user_login, user_email | user_pass, display_name, role |
wp_update_user | Update existing user | ID, fields object | user_email, display_name, user_pass, role |
Content Management (Posts & Pages)
| Function | Description | Key Features |
|---|---|---|
wp_get_posts | Retrieve posts list (default: 10) | Returns ID, title, status, excerpt, link |
wp_get_post | Get single post with full content | Complete post data including content |
wp_create_post | Create new post or page | Markdown support, auto-draft, custom fields |
wp_update_post | Update existing content | Meta fields, categories, all post fields |
wp_delete_post | Delete or trash content | Force delete or move to trash |
wp_count_posts | Get post counts by status | Supports custom post types |
Meta Fields & Custom Fields
| Function | Description | Use Case |
|---|---|---|
wp_get_post_meta | Retrieve custom fields | Get single field or all meta data |
wp_update_post_meta | Create/update custom fields | Add SEO data, custom properties |
wp_delete_post_meta | Remove custom fields | Clean up unused meta data |
Media Library Management
| Function | Description | Capabilities |
|---|---|---|
wp_get_media | List media items | Browse uploaded files |
wp_upload_media | Download from URL to Media Library | Auto-import external images |
wp_update_media | Update attachment metadata | Modify titles, alt text, descriptions |
wp_delete_media | Delete media files | Remove or trash attachments |
wp_set_featured_image | Set/remove featured images | Attach thumbnails to posts |
AI Image Generation
| Function | Description | Parameters |
|---|---|---|
aiwu_image | Generate AI images and store in Media Library | title, caption, description, alt |
Returns: ID, URL, title, caption, alt text
Taxonomy Management
| Function | Description | Use Case |
|---|---|---|
wp_get_taxonomies | List available taxonomies | Discover custom taxonomies |
wp_get_terms | List terms in taxonomy | Browse categories, tags |
wp_create_term | Create new taxonomy term | Add categories, tags |
wp_update_term | Modify existing term | Edit category names, descriptions |
wp_delete_term | Remove taxonomy term | Clean up unused terms |
wp_get_post_terms | Get terms attached to post | View post categorization |
wp_add_post_terms | Attach terms to posts | Categorize content |
Comments Management
| Function | Description | Key Features |
|---|---|---|
wp_get_comments | Retrieve comments (default: 10) | Author, content, date, status |
wp_create_comment | Add new comment | Requires post ID and content |
wp_update_comment | Modify existing comment | Update content, approval status |
wp_delete_comment | Remove comment | Force delete or trash |
Site Configuration
| Function | Description | Use Case |
|---|---|---|
wp_get_option | Retrieve WordPress options | Get site settings, configurations |
wp_update_option | Update site options | Modify settings, plugin options |
Content Discovery & Search
| Function | Description | Capabilities |
|---|---|---|
search | Full-text search across site | Search titles and content |
fetch | Retrieve complete post content | Get full article with metadata |
Post Type Management
| Function | Description | Returns |
|---|---|---|
wp_get_post_types | List public post types | Key and label pairs |
Analytics & Counting
| Function | Description | Parameters |
|---|---|---|
wp_count_posts | Count posts by status | Optional post type |
wp_count_terms | Count terms in taxonomy | Specific taxonomy |
wp_count_media | Count media attachments | Optional date filters |
Using Your WordPress MCP Integration
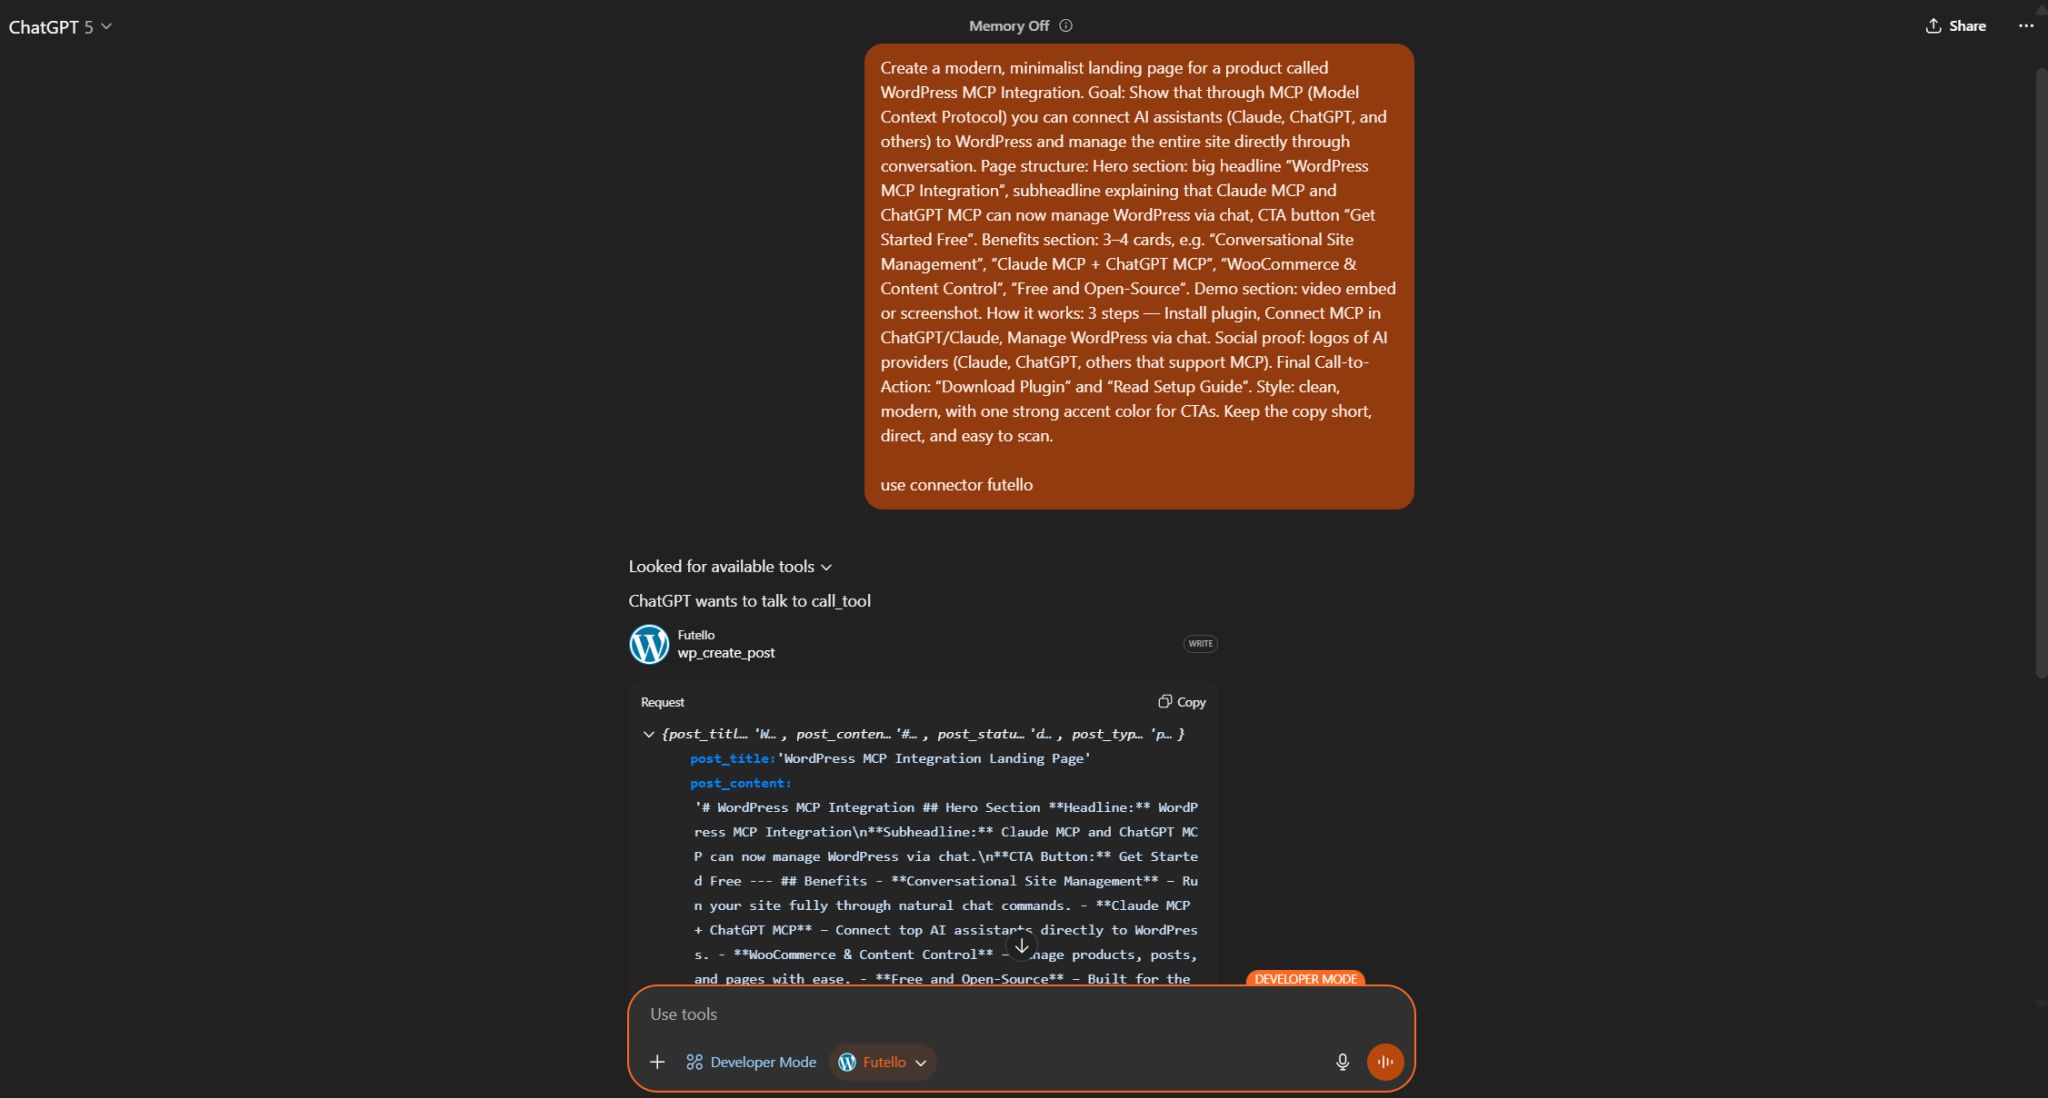
Now comes the fun part—actually using your AI assistant to manage your WordPress site. The beauty of MCP integration is its simplicity: just start a conversation like you would with any AI, but now your assistant can actually perform the tasks you describe.

Getting Started
Simply head to Claude.ai or ChatGPT and start chatting. For ChatGPT users, make sure Developer Mode is enabled and your WordPress connector is selected as the active source.
Your First Commands
Start with something simple to test the connection:
- “Can you check if you’re connected to my WordPress site?”
Your AI should respond with your site name and current time, confirming the MCP connection is working properly.
- “Show me my latest 5 blog posts”
This will display your recent content with titles, status, and excerpts—perfect for getting oriented.
Content Creation Examples
Once you’ve confirmed the connection works, try these practical commands:
- “Create a new blog post titled ‘WordPress Security Best Practices’ with an introduction paragraph and save it as a draft”
- “Generate an AI image about WordPress security and set it as the featured image for that post”
- “Create a new page called ‘About Us’ with placeholder content for a web development agency”
Site Management Tasks
- “List all my WordPress plugins and their versions”
- “Create a new user account for [email protected] with Editor role”
- “Show me all posts in the ‘Tutorial’ category”
E-commerce Operations
If you’re running WooCommerce:
- “Create a product page for a $99 WordPress course with basic description and pricing”
- “List all products that are currently out of stock”
The Key to Success
The more specific you are, the better results you’ll get. Instead of saying “update my site,” try “update the homepage title to ‘Best WordPress Development Services’ and add a meta description about our 10 years of experience.”
Your AI assistant can handle complex, multi-step operations in a single conversation, making WordPress management feel effortless for the first time.
Explore more at: