Bulk Article Creation: How to Create Articles in Mass
The WordPress AI Copilot – Bulk Content Generator allows you to efficiently create multiple articles at once directly on your WordPress site using the Open AI API. This feature is available in the Pro version of the plugin, providing a robust solution for scaling your content production. Here’s a step-by-step guide to using this feature.
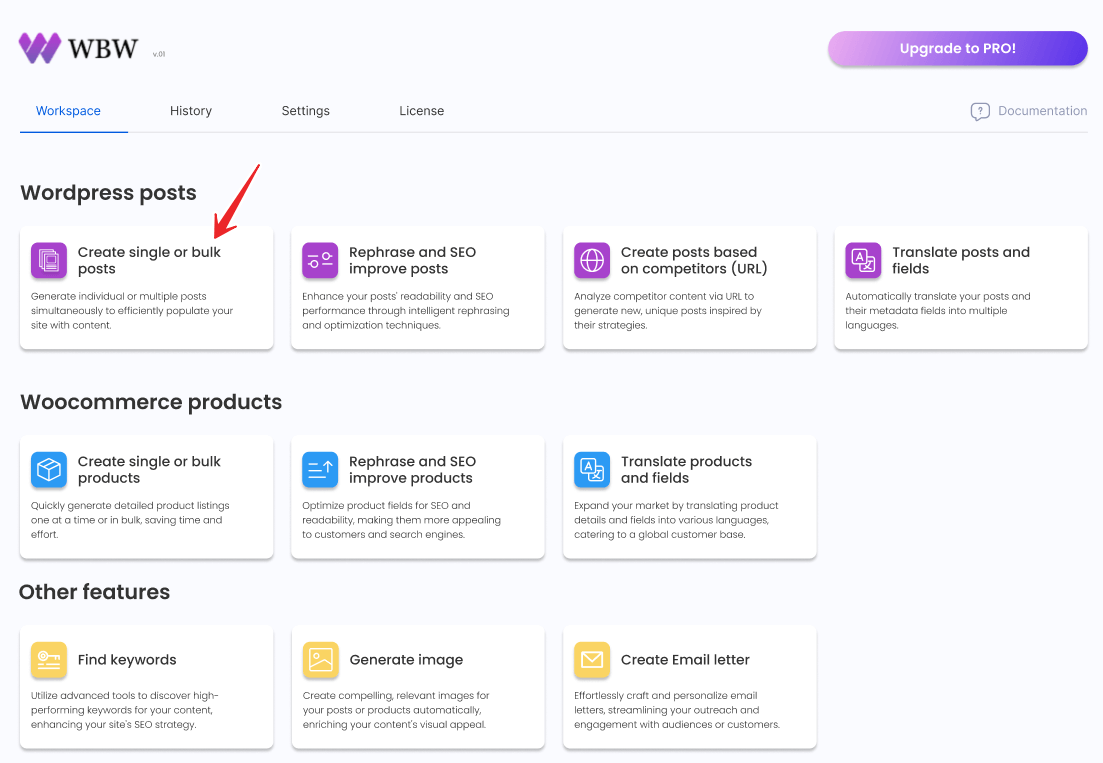
Accessing the Feature
- Navigate to the Dashboard: Log into your WordPress admin panel.
- Go to the Plugin Section: Find and click on the ‘WP Copilot’ plugin.
- Enter the Workspace: Here, you’ll see the option to ‘Create single or bulk posts’.
Setting Up Your Article
Using the WordPress AI Copilot – Bulk Content Generator, you can create multiple articles at once. Let’s walk through the process step-by-step, making everything clear and easy to understand.
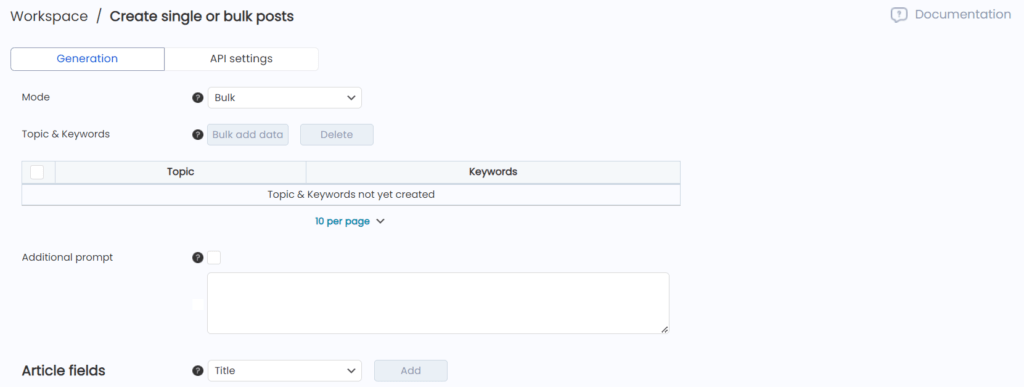
Step 1: Choosing Bulk Mode
First, ensure you are in Bulk Mode, which is available only in the Pro version. This mode is necessary for creating many articles simultaneously.
Step 2: Entering Topics and Keywords
Next, you need to enter the topics and keywords for your articles. Each topic and its keywords will generate one article.
Click on the “Bulk add data” button. This opens a large text box where you will enter all your topics and keywords.
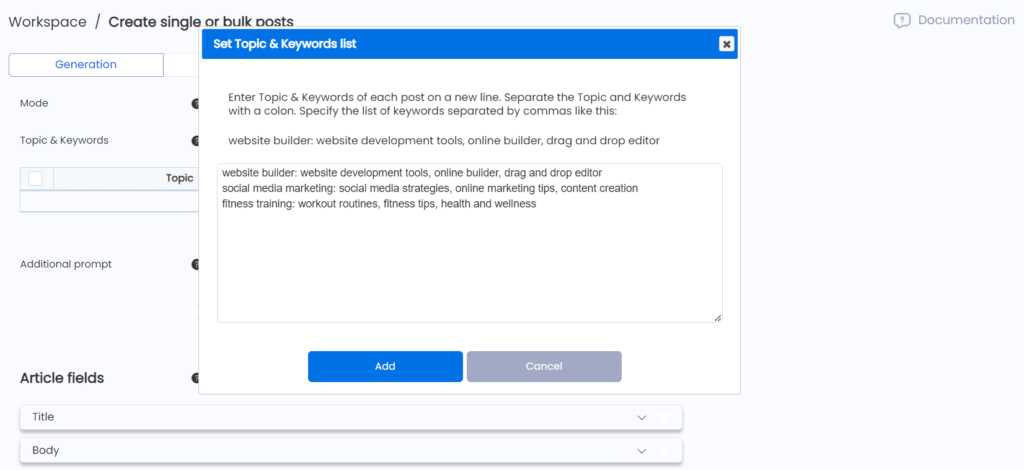
For each article, type the topic first. The topic is the main idea or theme of the article. After the topic, type a colon :. Then, list the keywords separated by commas. Keywords help the AI focus on specific aspects of the topic and improve SEO. Make sure each article’s topic and keywords are on a new line.
Example Format:
website builder: website development tools, online builder, drag and drop editor
social media marketing: social media strategies, online marketing tips, content creation
fitness training: workout routines, fitness tips, health and wellness
In this example:
- “website builder” is the topic.
- “website development tools, online builder, drag and drop editor” are the keywords.
If you made a mistake, simply select the row and click the “Delete” button to remove it. This helps you keep your list clean and accurate.
Step 3: Using Variables
The topics and keywords you entered can also be used as variables in additional prompts. For example:
{topic}will insert the topic you entered.{keyword1},{keyword2},{keyword3}, etc., will insert the corresponding keywords.
This allows for dynamic content generation that stays true to the core subject matter.
Step 4: Adding Additional Prompt
Provide any extra information or context to guide the content generation for the entire article. This prompt applies to the entire article, including all selected fields. If you want to specify an additional prompt for a specific field, you can do so below in the Article Fields section under the necessary field.
Customizing Article Fields
! Please note that all fields and settings will be applied to each article created.
The plugin allows for the generation of the following fields, which can be fully customized according to your preferences. Select the specific fields you want to be generated for your article. Use the dropdown menu to choose a desired field and click “Add” to include it in your article setup. Once added, you can customize the generation parameters for each selected field, ensuring your article meets your specific requirements.
Note that the fields Title, Body, and Publication Date are mandatory and cannot be removed.
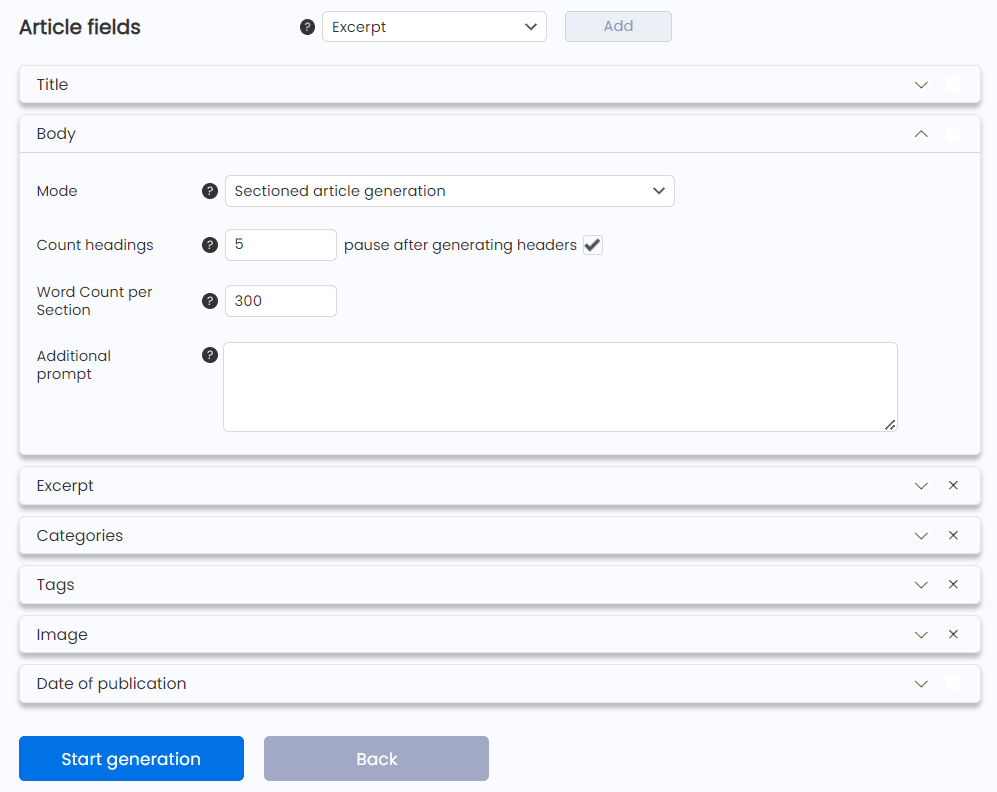
Here are the fields you can add and customize:
1. Title
The title field is mandatory and serves as a crucial element of your article. You can customize this field as follows:
- Mode: This setting determines how the article title will be generated:
- Generate based on Topic: Generates the article title based on the topic you enter.
- Generate based on Section Headers: Creates the article title based on the section headers within the article (unavailable for Single-prompt article body creation mode).
- Use Topic as Title: The article title will be exactly the same as the topic you enter.
- Additional Prompt for Title: Provide any extra context or specific instructions specifically for generating the article title. This prompt will help refine the title to better match your specific requirements or preferences.
2. Body
The body field is mandatory and contains the main content of your article. You can customize this field as follows:
- Mode: Choose how the body of the article will be generated:
- Single-prompt Article: Generates the entire body of the article in one step with a single API request based on the title.
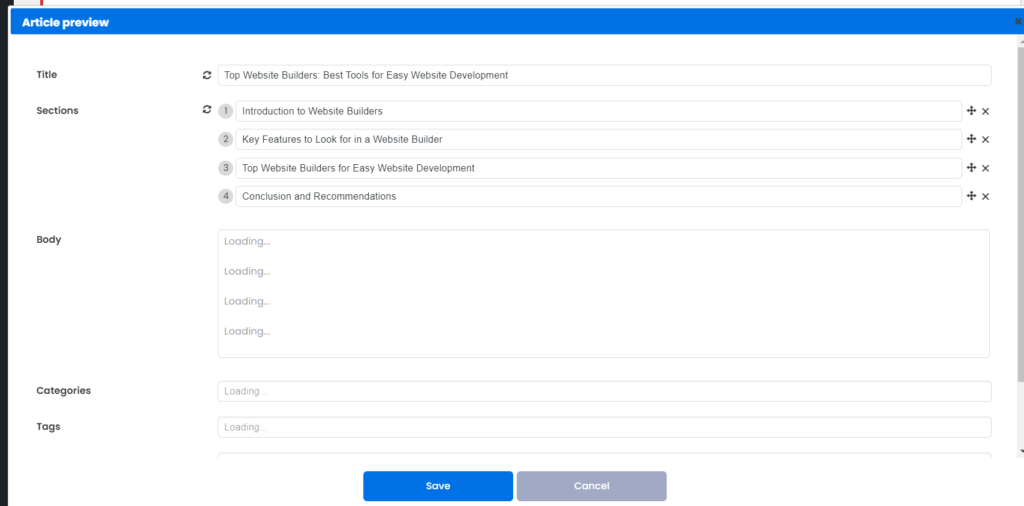
- Sectioned Article Generation: Generates the body of the article by first creating an outline and then generating each section individually. If selected, you need to specify the desired number of sections and their lengths.
- Custom Sectioned Article Generation: Allows you to manually input an outline, using variables like {topic}, {keyword1}, {keyword2}, etc., and then generates each section based on this custom outline before combining them into the full body. If selected, you need to specify the desired number of sections, their exact content, and their lengths.
- Additional Prompt for Body: Provide any extra context or specific instructions to refine the generation of the article body. This prompt will help customize the content based on your specific requirements or preferences.
3. Categories
Categories help organize your article within your site’s structure. You can customize this field as follows:
- Mode: Choose how categories for the article will be assigned:
- Fixed: Select existing categories.
- Generate based on Article: Generates a specified number of categories based on the article content.
- Additional Prompt for Categories: Provide any extra context or specific instructions to refine the generation of categories. This helps ensure the categories align with your specific requirements or preferences.
4. Tags
Tags are used to label the content with specific keywords, aiding in searchability. You can customize this field as follows:
- Mode: Choose how tags for the article will be assigned:
- Fixed: Select existing tags.
- Generate based on Article: Generates a specified number of tags based on the article content.
- Additional Prompt for Tags: Provide any extra context or specific instructions to refine the generation of tags. This helps ensure the tags align with your specific requirements or preferences.
5. Images
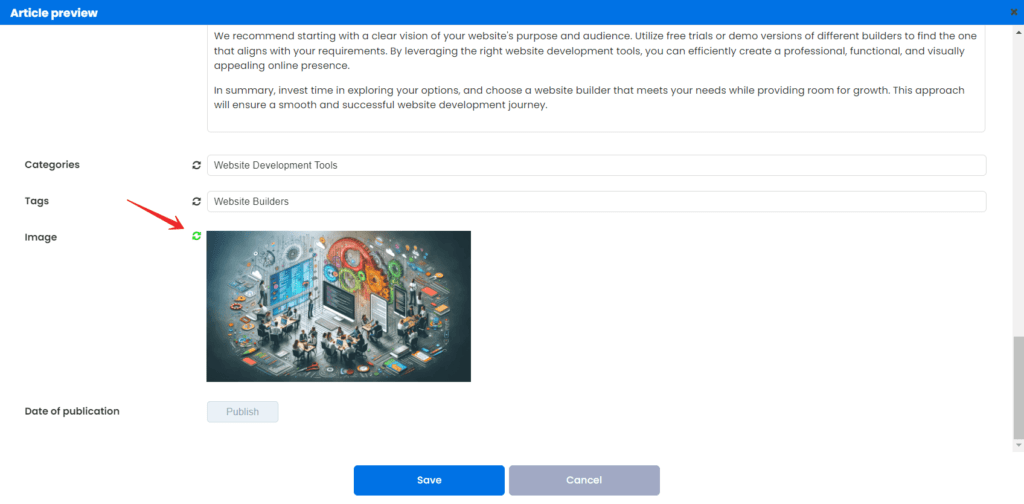
Images enhance the visual appeal of your article. You can customize this field as follows:
- Mode: Choose how images for the article will be generated.
- Preset: Select a predefined style or setting for the images to be generated, ensuring consistency with your article’s theme.
- Orientation: Choose the orientation for the images: square, horizontal, or vertical. Note: The DALL-E-2 model does not support article orientation options.
- Additional Prompt for Images: Provide specific instructions to refine the image generation.
6. Excerpts
Excerpts provide a brief summary of your article. You can customize this field as follows:
- Maximum Characters: Set the maximum number of characters for the excerpt. This limit helps ensure that the excerpt fits within the desired length constraints for your article.
- Additional Prompt for Excerpts: Provide any extra context or specific instructions to refine the generation of the excerpt. This helps customize the excerpt to better match your specific requirements or preferences.
7. Custom Fields and Taxonomies
Custom fields and taxonomies allow for additional, specific data to be attached to your article. These fields are typically created using plugins such as CPT UI and others. Since this is a custom field, you need to provide a clear explanation of what this field is and how it works:
- Mode: Choose how custom fields for the article will be assigned:
- Fixed: Enter an exact value for the custom field.
- Select Terms: Enter the value for the custom field.
- Generate based on Article: Generates the custom field value based on the article content, selected type, and desired length.
- Field Type: Select the type of custom field to determine how data will be generated and displayed:
- One-line: Generates a short single-line text entry based on the chosen length.
- Multi-line: Generates a long paragraph or block of text based on the chosen length.
- Numbers: Generates a numeric value based on the chosen length.
- Desired Length: Enter the desired length of the custom field.
- Description: Provide a description in your own words of what this field does or is used for. This helps generate the correct value for the selected custom field of the article.
- Field Type: Select the type of custom field to determine how data will be generated and displayed:
- Fixed: Enter an exact value for the custom field.
8. Publication Date
The publication date determines when your article will be published. You can customize this field as follows:
- Mode: Select how and when the article should be published. If publishing is selected, the article will be published immediately after generation without the opportunity to make intermediate edits:
- Do not publish: The article will be saved as a draft and not published.
- Publish instantly: The article will be published immediately after it is generated.
- Delayed publication: Set a specific future date and time for the article to be published. This allows you to schedule content to be released at optimal times.
- Publish randomly: The article will be published at a random time within a specified range.
- Publish 1 post every: Publish one post every specified interval (e.g., daily, weekly). This option is useful for maintaining a regular posting schedule without manual intervention.
By customizing the publication date, you can ensure your content is released in a timely and strategic manner, optimizing for audience engagement and SEO benefits.
Preview of Generating Content
Before starting the generation, ensure all settings are correctly adjusted in the API Settings. This ensures that the content generated aligns with your preferences and requirements. When ready, click “Start generation” to begin creating your article. If you need to make adjustments, select “Cancel” to return to the previous screen.
Once you click the “Start generation” button, you will see a preview of the generation process.
In Bulk mode, the preview is displayed in a table. Click on the “Preview” button to see the progress of generating each article’s fields.
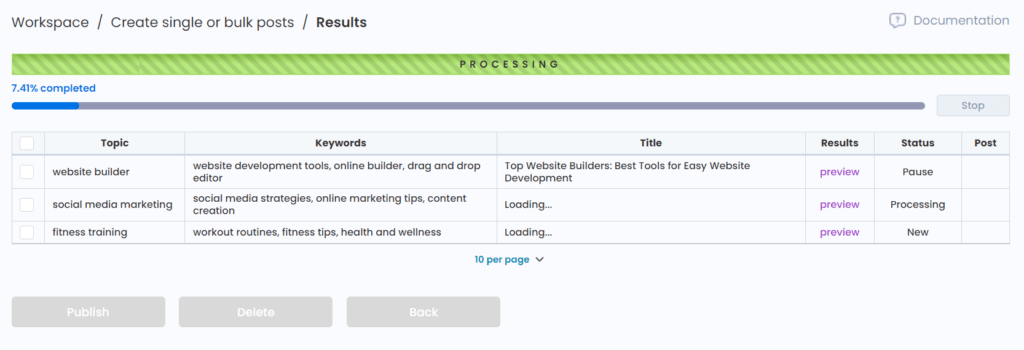
Stopping and Adjusting
If you realize something is not going as planned or you forgot to make necessary adjustments, you can stop the generation at any time by clicking the “Stop” button. After stopping, you can click the “Back” button to return to the previous generation settings screen.
IMPORTANT: Clicking “Back” will delete any content already generated for this operation. When everything is set correctly, simply press “Start” again to continue the generation process.
If you chose to generate the article body by sections and enabled the option to pause after creating section headers, the process will stop after the headers are generated so you can review them. Click “Preview” on each article and check the headings. If something needs to be adjusted, make the necessary changes and press “Start” to continue.
If the “publication date” was set to publish immediately, the articles will be published right away, and you can click the “View” button to see the created article.
Regenerating Content
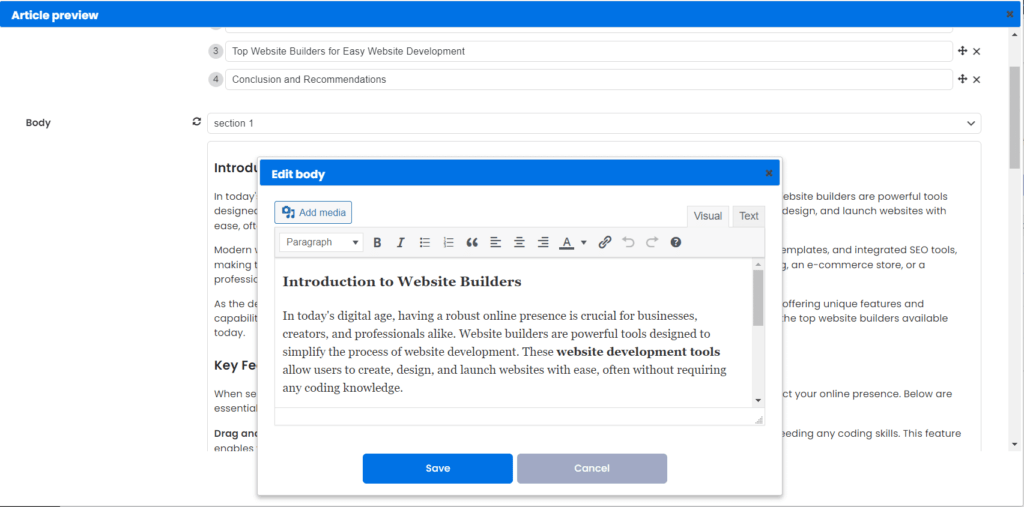
If you want to regenerate one or more fields of an article, stop the generation process, click “Preview” on the desired article, select the regeneration icon next to any field, and press “Start” to regenerate that specific field.
Editing Fields
If the option to publish the article immediately was not selected earlier, at this stage you can click on “Preview,” click on any field to manually edit its content. When you are satisfied with the content, press “Publish,” and your article will go live.
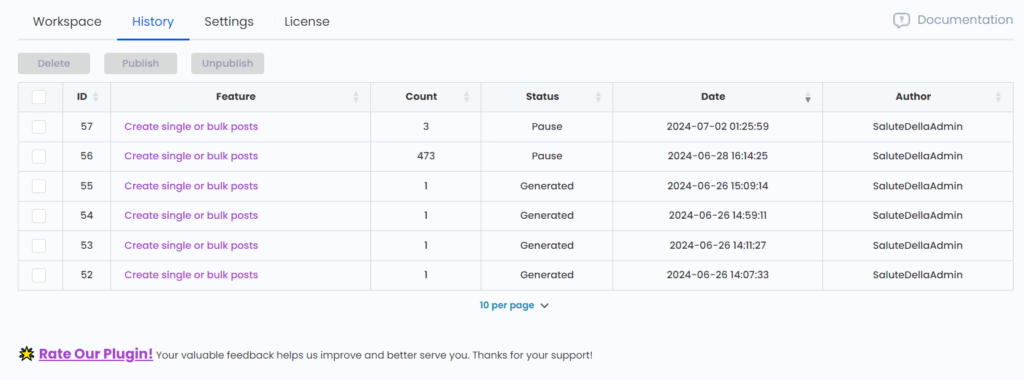
Managing Operations in the History Tab
All operations are saved in the History tab, allowing you to easily review, resume, modify, or delete them. This feature ensures you can keep track of your content generation activities and make necessary adjustments as needed. The History tab provides details such as operation ID, feature used, number of posts, status, date, and author, helping you maintain control and organization over your content creation process
We hope this guide has been helpful and has made the bulk content generation process easier and more efficient for you.