Generating a Single Article
Using the WordPress AI Copilot – Bulk Content Generator, you can effortlessly create a single article directly on your WordPress site using the Open AI API. This feature is available even in the free version of the plugin. Here’s how to navigate the process from start to finish.
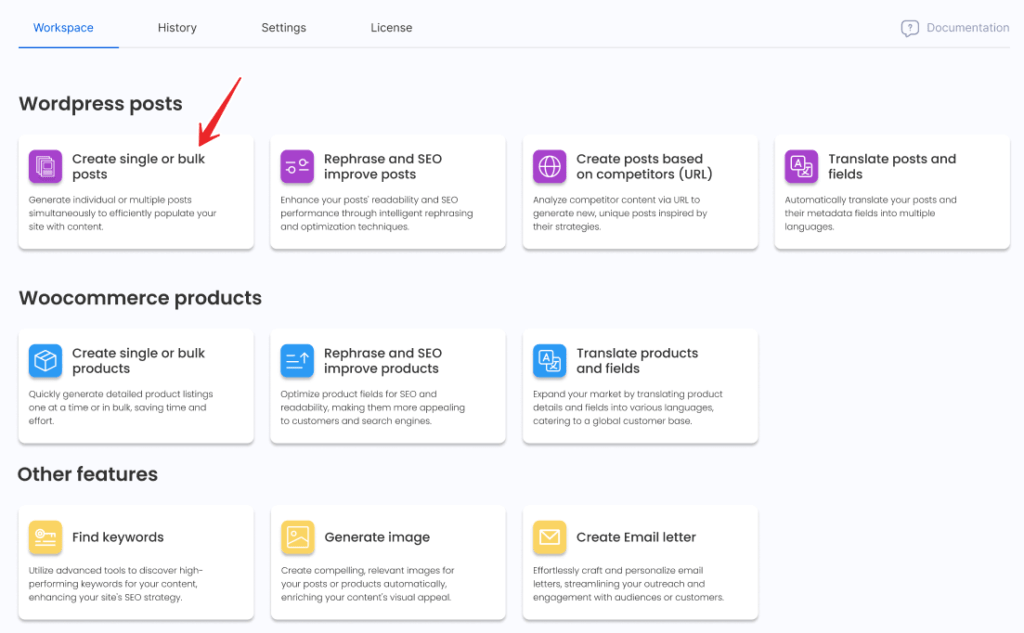
Accessing the Feature
- Navigate to the Dashboard: Log into your WordPress admin panel.
- Go to the Plugin Section: Find and click on the ‘WP Copilot’ plugin.
- Enter the Workspace: Here, you’ll see the option to ‘Create single or bulk posts’.
Setting Up Your Article
Setting up your article with WordPress AI Copilot is a straightforward yet customizable process. Here’s a detailed guide to configuring your article settings effectively:
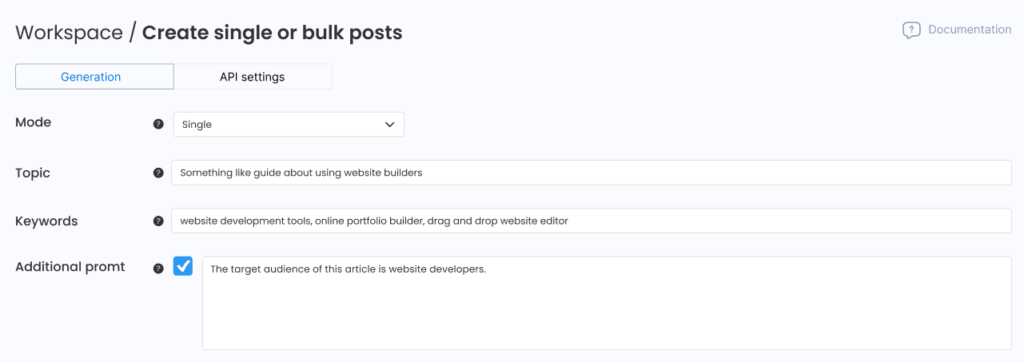
Select the Mode:
- Single Mode: Ideal for focusing on crafting a single, well-tuned article. This mode is perfect for users who need to generate content specifically tailored to a particular topic or occasion.
- Bulk Mode: Available with the Pro version, this mode allows for the generation of multiple articles at once, greatly increasing productivity for larger projects or content batches.
Define the Topic:
- Topic Selection: Enter a concise yet descriptive topic for your article. This acts as the foundation for all content generation, guiding the AI to produce relevant and focused material. The topic you choose should encapsulate the main idea or theme you wish to explore in your article.
- Utilizing Variables: Enhance the customization by using the
{topic}variable in additional prompts. This allows for dynamic content generation that stays true to the core subject matter.
Input Keywords:
- Keywords Integration: Type in keywords that are crucial to the SEO and relevance of your article. Place these keywords separated by commas to define their role in the content generation process.
- Keywords Variables: Use variables like
{keyword1}, {keyword2}, etc., to dynamically integrate these keywords into various parts of the article. This ensures that the content is not only SEO-friendly but also rich in the terms that are most likely to attract your target audience.
Additional Prompt:
Provide any extra information or context to guide the content generation for the entire article. This prompt applies to the entire article, including all selected fields. If you want to specify an additional prompt for a specific field, you can do so below in the Article Fields section under the necessary field.
By meticulously setting up each of these parameters, you ensure that the content generated not only meets but exceeds your expectations, providing tailored, impactful, and engaging articles that resonate with your audience.
Customizing Article Fields
The plugin allows for the generation of the following fields, which can be fully customized according to your preferences. Select the specific fields you want to be generated for your article. Use the dropdown menu to choose a desired field and click “Add” to include it in your article setup. Once added, you can customize the generation parameters for each selected field, ensuring your article meets your specific requirements.
Note that the fields Title, Body, and Publication Date are mandatory and cannot be removed.
Here are the fields you can add and customize:
1. Title
The title field is mandatory and serves as a crucial element of your article. You can customize this field as follows:
- Mode: This setting determines how the article title will be generated:
- Generate based on Topic: Generates the article title based on the topic you enter.
- Generate based on Section Headers: Creates the article title based on the section headers within the article (unavailable for Single-prompt article body creation mode).
- Use Topic as Title: The article title will be exactly the same as the topic you enter.
- Additional Prompt for Title: Provide any extra context or specific instructions specifically for generating the article title. This prompt will help refine the title to better match your specific requirements or preferences.
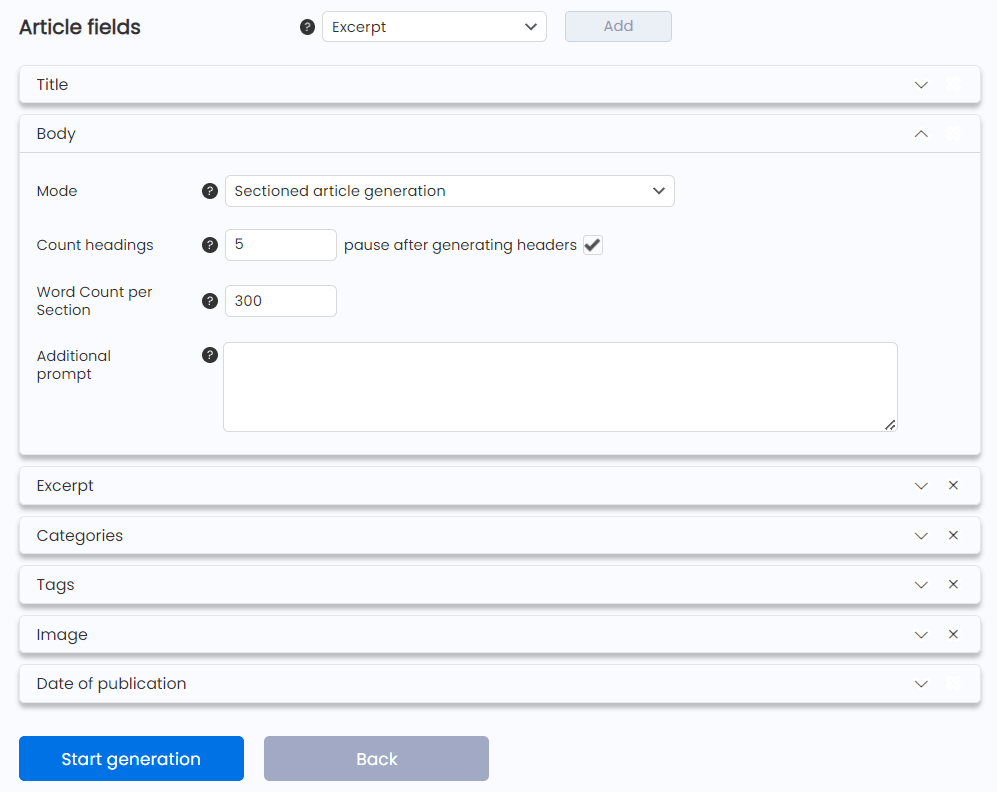
2. Body
The body field is mandatory and contains the main content of your article. You can customize this field as follows:
- Mode: Choose how the body of the article will be generated:
- Single-prompt Article: Generates the entire body of the article in one step with a single API request based on the title.
- Sectioned Article Generation: Generates the body of the article by first creating an outline and then generating each section individually. If selected, you need to specify the desired number of sections and their lengths.
- Custom Sectioned Article Generation: Allows you to manually input an outline, using variables like {topic}, {keyword1}, {keyword2}, etc., and then generates each section based on this custom outline before combining them into the full body. If selected, you need to specify the desired number of sections, their exact content, and their lengths.
- Additional Prompt for Body: Provide any extra context or specific instructions to refine the generation of the article body. This prompt will help customize the content based on your specific requirements or preferences.
3. Categories
Categories help organize your article within your site’s structure. You can customize this field as follows:
- Mode: Choose how categories for the article will be assigned:
- Fixed: Select existing categories.
- Generate based on Article: Generates a specified number of categories based on the article content.
- Additional Prompt for Categories: Provide any extra context or specific instructions to refine the generation of categories. This helps ensure the categories align with your specific requirements or preferences.
4. Tags
Tags are used to label the content with specific keywords, aiding in searchability. You can customize this field as follows:
- Mode: Choose how tags for the article will be assigned:
- Fixed: Select existing tags.
- Generate based on Article: Generates a specified number of tags based on the article content.
- Additional Prompt for Tags: Provide any extra context or specific instructions to refine the generation of tags. This helps ensure the tags align with your specific requirements or preferences.
5. Images
Images enhance the visual appeal of your article. You can customize this field as follows:
- Mode: Choose how images for the article will be generated.
- Preset: Select a predefined style or setting for the images to be generated, ensuring consistency with your article’s theme.
- Orientation: Choose the orientation for the images: square, horizontal, or vertical. Note: The DALL-E-2 model does not support article orientation options.
- Additional Prompt for Images: Provide specific instructions to refine the image generation.
6. Excerpts
Excerpts provide a brief summary of your article. You can customize this field as follows:
- Maximum Characters: Set the maximum number of characters for the excerpt. This limit helps ensure that the excerpt fits within the desired length constraints for your article.
- Additional Prompt for Excerpts: Provide any extra context or specific instructions to refine the generation of the excerpt. This helps customize the excerpt to better match your specific requirements or preferences.
7. Custom Fields and Taxonomies
Custom fields and taxonomies allow for additional, specific data to be attached to your article. These fields are typically created using plugins such as CPT UI and others. Since this is a custom field, you need to provide a clear explanation of what this field is and how it works:
- Mode: Choose how custom fields for the article will be assigned:
- Fixed: Enter an exact value for the custom field.
- Select Terms: Enter the value for the custom field.
- Generate based on Article: Generates the custom field value based on the article content, selected type, and desired length.
- Field Type: Select the type of custom field to determine how data will be generated and displayed:
- One-line: Generates a short single-line text entry based on the chosen length.
- Multi-line: Generates a long paragraph or block of text based on the chosen length.
- Numbers: Generates a numeric value based on the chosen length.
- Desired Length: Enter the desired length of the custom field.
- Description: Provide a description in your own words of what this field does or is used for. This helps generate the correct value for the selected custom field of the article.
- Field Type: Select the type of custom field to determine how data will be generated and displayed:
- Fixed: Enter an exact value for the custom field.
8. Publication Date
The publication date determines when your article will be published. You can customize this field as follows:
- Mode: Select how and when the article should be published. If publishing is selected, the article will be published immediately after generation without the opportunity to make intermediate edits:
- Do not publish: The article will be saved as a draft and not published.
- Publish instantly: The article will be published immediately after it is generated.
- Delayed publication: Set a specific future date and time for the article to be published. This allows you to schedule content to be released at optimal times.
- Publish randomly: The article will be published at a random time within a specified range.
- Publish 1 post every: Publish one post every specified interval (e.g., daily, weekly). This option is useful for maintaining a regular posting schedule without manual intervention.
By customizing the publication date, you can ensure your content is released in a timely and strategic manner, optimizing for audience engagement and SEO benefits.
Preview of Generating Content
Before starting the generation, ensure all settings are correctly adjusted in the API Settings. This ensures that the content generated aligns with your preferences and requirements. When ready, click “Start generation” to begin creating your article. If you need to make adjustments, select “Cancel” to return to the previous screen.
Once you click the “Start generation” button, you will see a preview of the generation process. Each field you previously selected will begin generating content according to the specified settings.
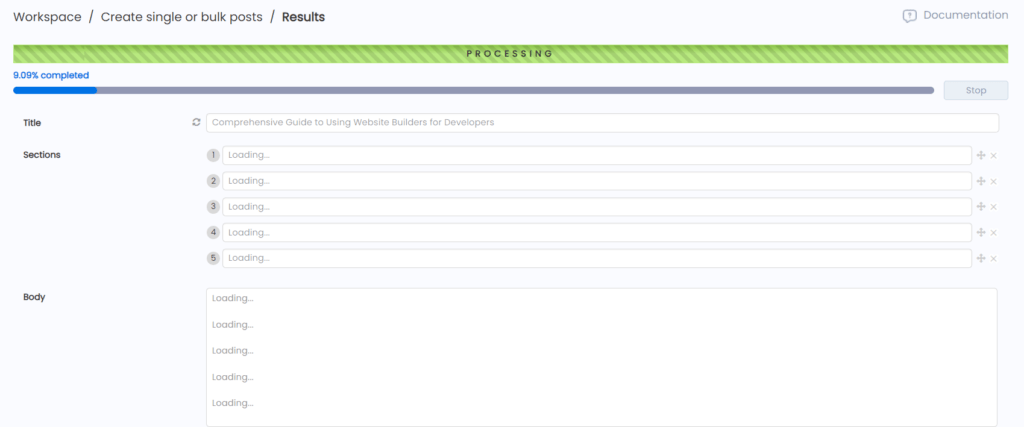
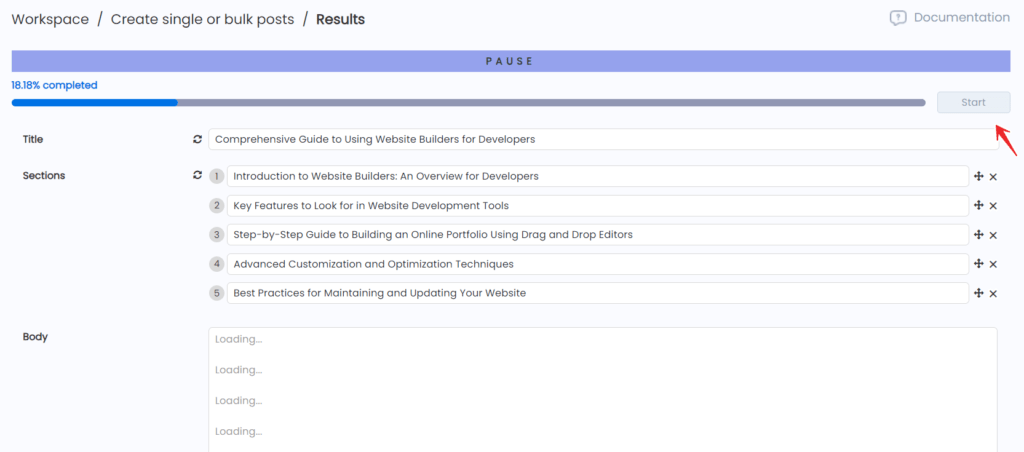
Monitoring the Process
Each selected field will display a progress bar indicating the generation status. You can monitor the titles, sections, and body content as they are being generated.
Stopping and Adjusting
If you realize something is not going as planned or you forgot to make necessary adjustments, you can stop the generation at any time by clicking the “Stop” button. After stopping, you can click the “Back” button to return to the previous generation settings screen.
IMPORTANT: Clicking “Back” will delete any content already generated for this operation.
When everything is set correctly, simply press “Start” again to continue the generation process.
Sectioned Article Generation
If you chose to generate the article body by sections and enabled the option to pause after generating section headers, the process will stop after the headers are generated so you can review them. Make any necessary changes and press “Start” to continue.
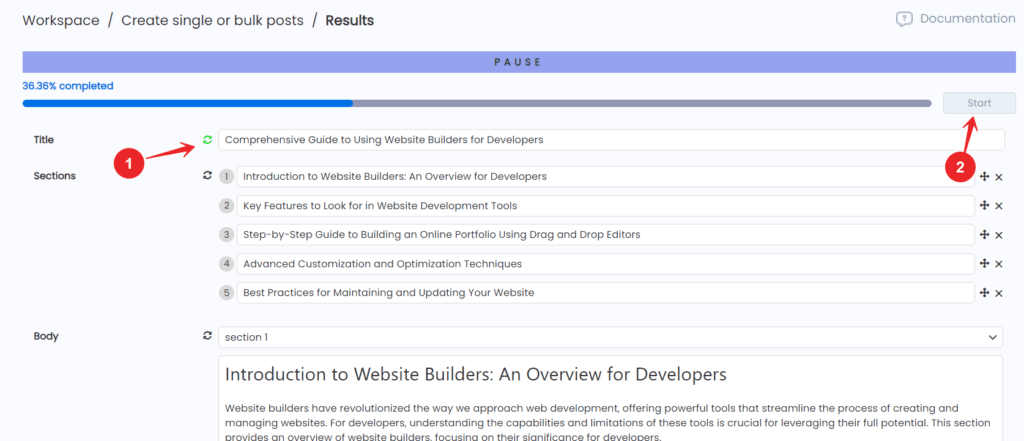
Regenerating Content
Once all fields are generated, you can click the regeneration icon next to any field and press “Start” to regenerate that specific field.
Final Review and Publishing
If the option to publish the article immediately was not selected earlier, at this stage you can click on any field to manually edit its content.
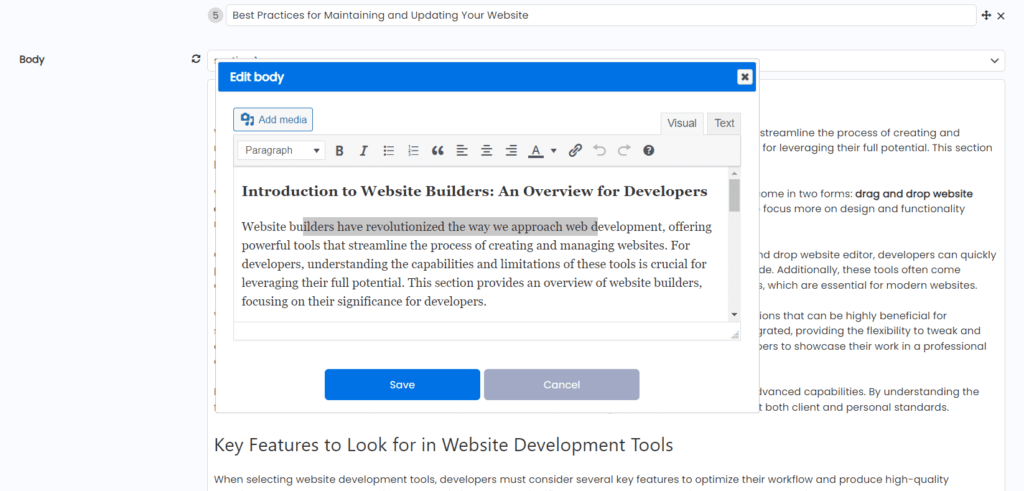
When you are satisfied with the content, press “Publish,” and your article will go live.
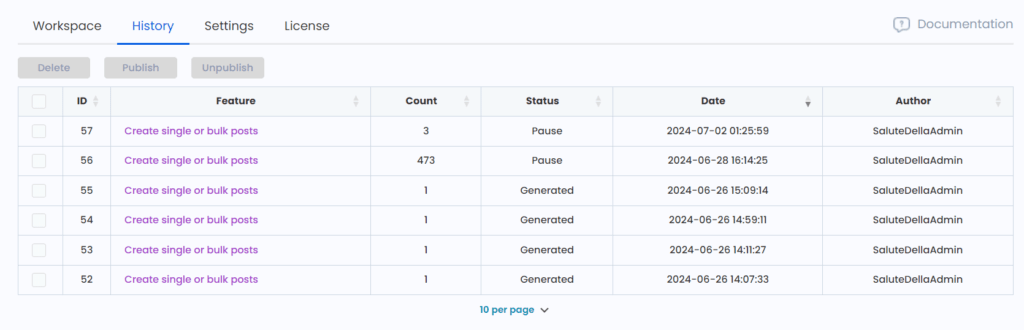
Managing Operations in the History Tab
All operations are saved in the History tab, allowing you to easily review, resume, modify, or delete them. This feature ensures you can keep track of your content generation activities and make necessary adjustments as needed. The History tab provides details such as operation ID, feature used, number of posts, status, date, and author, helping you maintain control and organization over your content creation process
We hope this guide has been helpful in navigating the generation and finalization of content using the WordPress AI Copilot. For further assistance, please refer to our other detailed guides and resources.