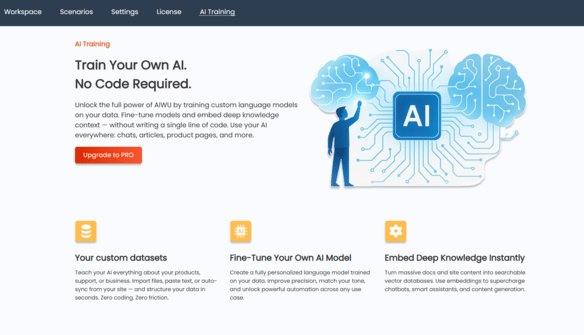
How to Train a Custom AI Chatbot in WordPress with Datasets, Embeddings And Fine-Tuning : A Practical Guide for AIWU AI Copilot plugin
In the world of content creation and customer interaction, personalization is no longer a luxury it’s a necessity. Generic responses and one-size-fits-all models are quickly becoming obsolete. That’s where AIWU AI Copilot steps in, offering WordPress users a powerful new capability: the ability to train and configure custom language models tailored specifically to their data and business needs without writing a single line of code.
Why Train Your Own Model?
Most AI content generators rely on pre-trained, general-purpose models like GPT or Gemini. While they’re incredibly capable, they lack the specific context that makes your business unique. What if you could teach the AI to understand your brand voice, product specifics, industry jargon, and even internal documentation? With AIWU AI Copilot, now you can.
This feature allows you to:
- Train your own language models using your own datasets.
- Integrate deep contextual understanding through embeddings and fine-tuning.
- Deploy these models as the main engine behind your chatbots, content generation, product descriptions, FAQs, and more.
The result? A smarter, more relevant, and highly personalized AI assistant that speaks exactly the way your audience expects because it learned from your data.
Why OpenAI API Is Used (For Now)
At the time of this writing, AIWU AI Copilot relies on the OpenAI API for model training and deployment. This decision was not made lightly. Here’s why:
- Gemini (Google) – currently does not support custom model training or external embeddings, which are essential for building domain-specific AI assistants.
- DeepSeek – while promising, offers limited customization options, requires manual pipeline configuration, and lacks a native API for model training.
- OpenAI, on the other hand, provides a robust, well-documented API with full support for both embeddings and fine-tuning, making it the ideal foundation for this feature.
That said, the system architecture has been designed with future scalability in mind. As other providers begin to offer comparable capabilities, AIWU will be ready to integrate them seamlessly, giving users greater choice and flexibility.
Where to Find the AI Training Tools in the Plugin Interface
Once AIWU AI Copilot is installed and activated, you’ll find the tools for configuring and training your chatbot in two key places within the WordPress Dashboard:
In the plugin header (top bar)
At the top of the AIWU AI Copilot interface, you’ll see a new tab labeled “AI Training”. This tab serves as a direct entry point to data upload tools, training settings, and management of trained models.

In the WordPress dashboard sidebar menu under AIWU
If you prefer working through the main WordPress navigation panel, open the AIWU section in the left sidebar. There, you’ll find the “AI Training” item, which also leads to the same set of training tools.
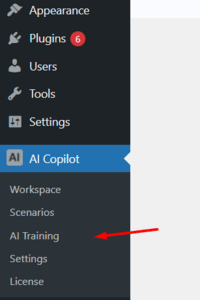
Both paths lead to the same functionality, so you can choose whichever suits your workflow best. This dual placement is especially useful when working across different user roles: for example, a marketer might prefer the quick access via the header, while a developer or administrator may opt for the traditional sidebar menu.
“AI Training”
- Datasets.
- Fine-Tuned Models.
- Embeddings.
Understanding the Datasets Section
The Datasets section is where you manage all the data that will power your custom AI models. Whether you’re building embeddings for semantic search or fine-tuning a model to reflect your brand voice, this is where it all starts.
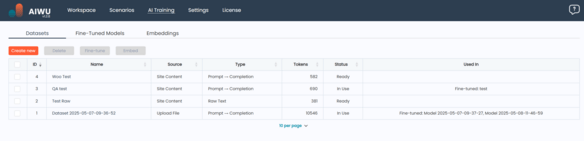
Once you navigate to the AI Training tab, you’ll find yourself on the Datasets screen. Here, you can see a list of all datasets you’ve created, along with key information about each one:
Dataset Overview
Each dataset entry includes the following details:
- ID – A unique identifier assigned by the system to help track and reference the dataset internally.
- Name – A user-defined title for the dataset. Clicking the name opens the dataset editor, allowing you to review or modify its contents.
- Source – Describes where the dataset came from:
- Upload File : You’ve imported a file (CSV, TXT, PDF, DOCX) containing raw text or prompt-completion pairs.
- Text Input : The dataset was created manually by entering content directly into the plugin interface.
- Site Content : Automatically generated from existing content on your site – such as blog posts, pages, or product descriptions. This is ideal for quickly training a chatbot to understand your brand tone or product catalog.
- Type – Indicates how the dataset is structured:
- Raw Text : Suitable for generating embeddings , which allow the AI to understand semantic meaning and context.
- Prompt → Completion : Designed for fine-tuning , where each entry consists of a prompt and the desired response. This helps train the model to generate accurate, brand-aligned replies.
- Tokens – An estimate of how many tokens the dataset contains. This matters because token count affects both training cost and model performance. Keeping datasets lean and relevant helps maintain efficiency.
- Status – Shows the current processing state of the dataset:
- Ready : The dataset is validated and ready for use.
- Processing : The system is parsing or preparing the dataset.
- Invalid : There was an issue with formatting or content. You’ll need to fix the dataset before proceeding.
- In Use : The dataset is currently being used in an active embedding or fine-tuned model.
- Used In – Tells you whether the dataset is already part of an embedding or a fine-tuned model, and if so, which one.
Available Actions
For each dataset, you can perform several actions via buttons:
- Embed – Available only for datasets of type Raw Text. This option initiates the creation of a new embedding model , which captures semantic relationships between pieces of text. After selecting this, you’ll be taken to the embedding configuration screen.
- Fine-tune – Available only for datasets of type Prompt → Completion. Selecting this begins the process of creating a custom-trained model tailored to your specific prompts and responses. You’ll then move to the fine-tuning settings page.
- Delete – Removes the dataset from your library.
You can also select multiple datasets at once to apply bulk operations like Embed , Fine-tune , or Delete , depending on their types and statuses. This is especially useful when managing large-scale training projects.
Creating a New Dataset
At the top of the Datasets screen, you’ll find the Create New button. When clicked, it opens a setup wizard where you first choose the Source of your data:
- Imported File – Upload a local file in CSV, TXT, PDF, or DOCX format. Make sure the file is clean and well-structured to avoid validation errors later.
- Text Input – Paste or type content directly into the plugin interface. This is great for small datasets or testing ideas quickly.
- Site Content – Let the plugin extract content automatically from your WordPress site. You can select specific post types (like posts, pages, or WooCommerce products) and even filter by category or tags.
After choosing a source and uploading or inputting the data, you’ll proceed to verify and finalize the dataset before using it for training.
Option 1: Creating a Dataset – Manual Text Input
If you don’t have a file ready or want to quickly test an idea before uploading bulk data, AIWU AI Copilot offers the Text Input option for dataset creation. This allows you to manually enter content directly in the plugin interface.
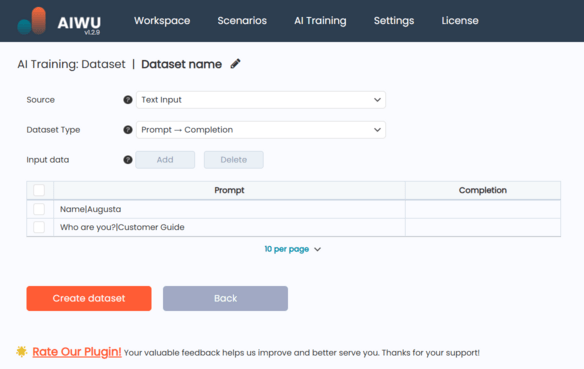
Once you click New Dataset and select Text Input, you’ll be taken to a simple form where you can:
- Enter a name for your dataset
- Choose the dataset type:
- Raw Text suitable for creating embeddings (semantic understanding of your content)
- Prompt → Completion used for fine-tuning models to respond like your team would
Raw Text Mode
When you choose Raw Text, the interface displays a multi-line text field labeled Input Text. Here, you can paste or type any unstructured content you want the model to learn from such as product descriptions, internal documentation, or snippets of brand voice guidelines.
This mode is ideal when:
- You’re working with large blocks of continuous text
- You want to generate semantic embeddings
- You don’t need structured prompt-response pairs
After entering your text, use the buttons at the bottom to:
- Create Dataset saves your input as a new dataset
- Back returns to the Datasets overview without saving
- Once text is entered and “Create” is clicked, the button changes to Save Dataset, allowing further edits later
Prompt → Completion Mode
Choosing Prompt → Completion switches the interface to a table-based format, designed specifically for training chatbots or custom models that generate structured responses.
In this mode:
- Each row represents a training pair: a user question or input (prompt), and the desired AI response (completion)
- You can add or remove rows using the Add and Delete buttons above the table
For example:
What is your return policy? : Our standard return period is 30 days from the date of purchase.
Do you offer international shipping? : Yes, we ship to over 50 countries worldwide.
Tip: Ensure consistency in tone, grammar, and formatting across all pairs. This helps the model generalize better and maintain a natural conversational flow.
When you click Add, a popup appears where you can enter multiple pairs at once:
- Each pair should be on a new line
- Separate Prompt and Completion with a colon (
:)
Example input in the popup:
How do I track my order? : Visit our tracking page and enter your order number.
Can I cancel my subscription? : Yes, you can cancel anytime in your account settings.
After confirming, these will appear in the table below, where you can check or delete them individually.
The Create Dataset button becomes active only when at least one valid pair has been added.
Managing Your Dataset
Once created, you can always return to edit your dataset:
- Use the Save button instead of Create Dataset when making updates
- If you’re not satisfied with the current version, click Back to discard unsaved changes
Whether you’re building a knowledge base for embeddings or training a customer support bot, the Text Input method gives you full control over your training data right from your WordPress dashboard.
Option 2: New Dataset – Uploading a File
For users who already have content prepared outside of WordPress such as training data, internal documentation, or structured Q&A pairs AIWU AI Copilot offers the Upload File method for dataset creation. This is ideal when you want to import large volumes of data quickly and efficiently, without manual entry.
Once you click New Dataset and select Upload File, you’ll be taken to a form where you can:
- Enter a name for your dataset
- Upload a file containing either unstructured text or structured prompt-completion pairs
Supported File Types
AIWU AI Copilot supports a variety of file formats, each mapped automatically to a specific dataset type based on its structure:
| File Format | Dataset Type |
|---|---|
.txt | Raw Text |
.md | Raw Text |
.pdf | Raw Text |
.docx | Raw Text |
.csv | Prompt → Completion (default) |
.json | Prompt → Completion (default) |
Note: You can override the default file type if needed
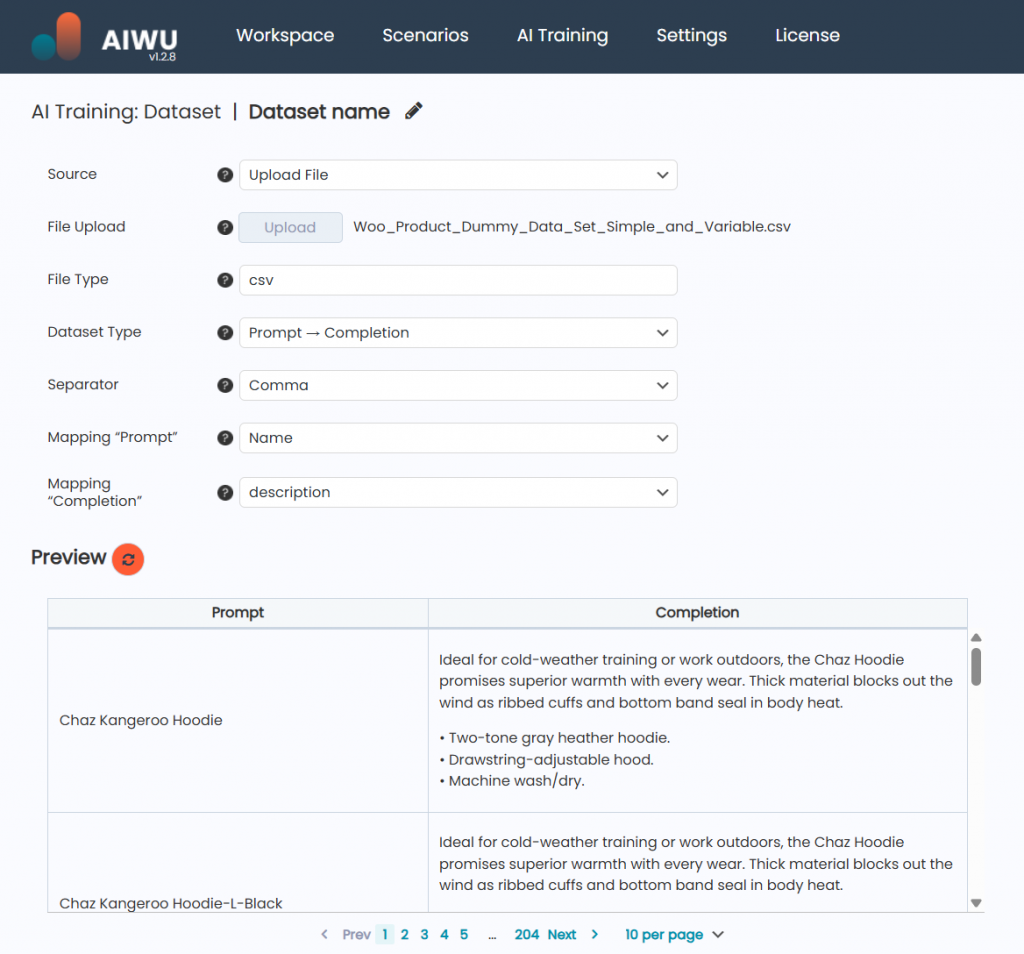
Working with CSV Files
CSV files are perfect for creating Prompt → Completion datasets because they allow structured pairing of questions and answers. When you upload a CSV file, AIWU AI Copilot will:
- Automatically detect the format
- Show a preview of the data
- Let you adjust settings before finalizing the dataset
You’ll see the following options:
- Dataset Type
By default, it’s set to Prompt → Completion, but you can switch to Raw Text if your CSV contains unstructured data. - Separator
Choose the delimiter used in your file. Common separators include:- Comma
, - Semicolon
; - Colon
: - Tab
\tSelecting the correct separator ensures your data is parsed accurately.
- Comma
- Mapping “Prompt” – Choose the column header that contains the user input (e.g.,
"Question"or"Query"). - Mapping “Completion” – Choose the column header that contains the expected response (e.g.,
"Answer"or"Response"). - Preview – A live preview shows how your data will be interpreted during model training. Make sure each prompt has a valid corresponding completion.
Example CSV Content
Question,Answer
What is your return policy?,Our standard return period is 30 days from the date of purchase.
Do you offer international shipping?,Yes we ship to over 50 countries worldwide.
This format helps train models to generate accurate, context-aware replies especially useful for chatbots, FAQ assistants, or customer support tools.
Working with JSON Files
JSON files also fall under the Prompt → Completion category by default. Unlike CSV, JSON doesn’t require selecting a separator or mapping columns manually the plugin parses the structure automatically.
However, you can still:
- Change the dataset type to Raw Text if desired
- Review a preview of how each pair will be used
A typical JSON structure looks like this:
[
  {
    "prompt": "How do I track my order?",
    "completion": "Visit our tracking page and enter your order number."
  },
  {
    "prompt": "Can I cancel my subscription?",
    "completion": "Yes, you can cancel anytime in your account settings."
  }
]
Make sure your JSON keys are consistent and clearly labeled ("prompt" and "completion" are recommended), so the system can map them correctly.
Working with TXT, DOCX, or PDF Files
These formats are best suited for Raw Text datasets ideal for generating embeddings or training models to understand the semantic meaning of your content.
When you upload one of these files:
- The dataset type defaults to Raw Text
- The plugin displays a text preview instead of a table
- No need to specify separators or column mappings
These files are great for:
- Feeding brand voice guidelines into the model
- Training embeddings for search or recommendation systems
- Capturing domain-specific knowledge from internal documents
Just make sure the text is clean avoid unnecessary formatting, HTML tags, or special characters that might interfere with parsing.
Final Tips for Uploading Files
- Validate your file before uploading: Ensure there are no missing rows, inconsistent formatting, or encoding issues.
- Trim the fat: Remove irrelevant sections or duplicate entries to keep your dataset focused.
- Check token count: Large files may result in high token usage, which affects training time and cost.
- Use UTF-8 encoding for best compatibility, especially when working with non-English text.
By choosing the right file format and preparing your data thoughtfully, you’ll give your custom AI model the best chance to learn effectively and deliver results that feel truly personalized.
Option 3: Creating a Dataset from Site Content
If your WordPress site already contains a wealth of content whether it’s blog posts, product listings or landing pages you can use that directly as the foundation for training your AI model. This method allows you to extract structured or unstructured text from WordPress posts, pages, and WooCommerce products , without needing to export or reformat anything manually.
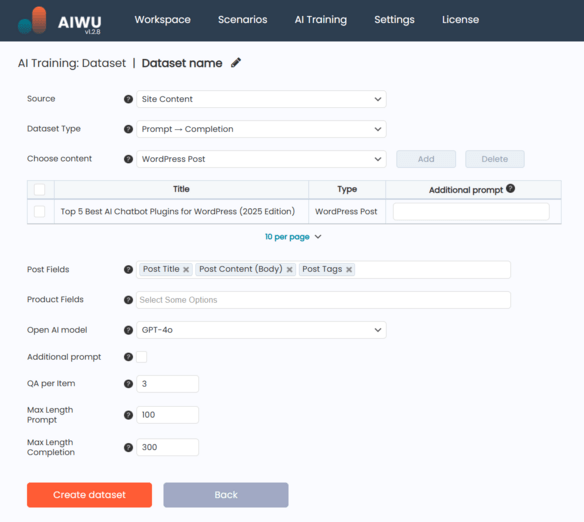
Once you choose Site Content as your dataset source, you’ll be able to define what kind of content will be used for training. The system supports three main types:
- WordPress Posts
- WordPress Pages
- WooCommerce Products
Selecting Specific Items
After choosing the content type, you’ll see a table interface where you can add specific items to include in your dataset. A simple Add button opens a popup window with filters and a search field, allowing you to locate and select individual posts, pages, or products by title or ID.
Each selected item appears in the table with:
- The title of the content
- Its type (Post, Page, or Product)
- An optional Additional Prompt field, which lets you provide context or instructions specific to that item
This is useful if you want the AI to treat certain items differently for example, applying a more formal tone when generating responses about enterprise products versus casual descriptions for consumer goods.
Choosing Fields to Use
Next, you specify which fields from each content type should be used to generate the dataset.
For WooCommerce Products , you can select from:
- Product Name
- Description
- Short Description
- Tags and Categories
- SKU
- Attributes
- Price
- Stock Status
Variations are treated as separate items, so you can train your model on highly specific product details.
For WordPress Posts , available fields include:
- Title
- Body Content
- Excerpt
- Tags
- Categories
- Author Name
- Publish Date
You’re not limited to just one field you can include multiple, giving the AI a richer context to work with.
Configuring the Generation Process
Before generating the dataset, you’ll also need to choose the OpenAI model that will be used to process your content. This affects both the quality of the output and the cost of processing, so it’s worth considering based on your use case.
You can also add a global additional prompt an instruction applied to all items. For instance, this could be something like “Answer questions about our services in a friendly, conversational tone.”
Depending on the dataset type you’ve selected Raw Text or Prompt → Completion different configuration options appear:
- In Raw Text mode, you set a maximum token length per item , helping control the size and relevance of the generated entries.
- In Prompt → Completion mode, you define how many QA pairs to generate per item, along with maximum token lengths for prompts and completions separately.
These settings help maintain consistency and efficiency across your dataset.
Generating the Dataset
Once everything is configured, click Create dataset to start the generation process. The system will go through each selected item, apply your settings, and create a clean, ready-to-use dataset.
After generation, you’ll get a preview of the results and the option to make manual edits, just like in the Manual Text Input mode. From there, you can proceed to use this dataset for embedding creation or model fine-tuning , depending on your needs.
Use the Back button at any time to return to the Datasets overview without saving changes.
Why This Matters
Using your own site content as a data source offers real advantages:
- You don’t have to export or reformat anything everything stays within WordPress
- Your model always learns from the latest version of your content
- It ensures consistency in tone, terminology, and style
- And most importantly it saves time while delivering relevant, high-quality training data
By using this feature, you’re not just feeding data into an AI you’re shaping how it understands and represents your business.
Fine-Tuned Models: Training Your Own Custom AI
Once you’ve prepared one or more datasets of type Prompt → Completion, you’re ready to take the next step: training your own custom AI model. The Fine-Tuned Models tab is where this happens it’s the place to create, manage, and test models trained specifically on your data.
This feature allows you to build a version of an OpenAI model that has learned from your content, whether it’s internal documentation, customer support logs, product descriptions, or any other structured Q&A format. The result? A smarter, more relevant AI assistant that reflects your brand voice, understands your domain-specific language, and delivers accurate, consistent responses.
Managing Fine-Tuned Models
In the Fine-Tuned Models section, you’ll see a list of all models you’ve created. Each entry includes:
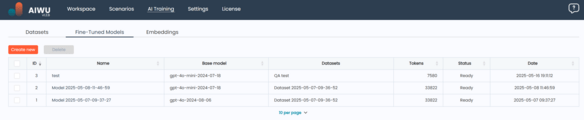
- ID: A unique identifier assigned by the system for tracking purposes
- Model Name: A user-defined label that helps you distinguish between different versions or use cases. Clicking the name opens the editing screen (note: OpenAI doesn’t allow direct retraining of existing models – editing effectively means creating a new version based on updated data)
- Base Model: The original OpenAI model used as a starting point for fine-tuning (e.g.,
gpt-3.5-turbo) - Dataset(s): One or more datasets used during training, ensuring traceability and transparency
- Date: When the training job was initiated
- Status: Shows whether the model is:
- Training – actively being built
- Ready – successfully trained and available for use
- Failed – something went wrong during training (you can check logs or retry with adjusted parameters)
- Tokens Used: Total token count consumed during training – important for cost estimation
- Actions: Available operations include:
- Test – available only for Ready models, lets you interactively evaluate performance
- Delete – removes the model when no longer needed
You can also select multiple models at once and delete them using the Delete button at the top – handy when cleaning up outdated versions.
Testing a Fine-Tuned Model
Before putting a model into production, it’s wise to test how it performs in real-world scenarios. That’s where the Test feature comes in.
Clicking Test opens a simple chat-style popup with:
- A text input field for entering a prompt
- A preview window showing the model’s response
Behind the scenes, the system sends your prompt to the OpenAI API and waits for a reply. This gives you an immediate sense of how well the model aligns with your expectations.
Use this tool to:
- Verify consistency in tone and style
- Check factual accuracy against known answers
- Identify edge cases or areas where the model might need more training
If the results aren’t quite right, consider revisiting your dataset, refining prompts, or retraining with additional examples.
Creating a New Fine-Tuned Model
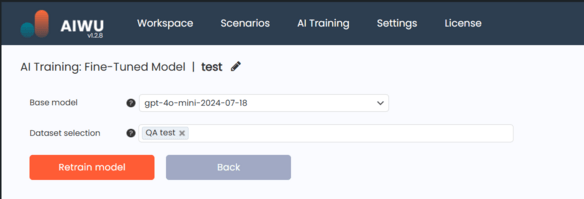
To start training a new model, click the Create new button at the top of the page. You’ll be taken to a setup screen where you can:
- Enter a name for your model
- Choose a base model (e.g.,
gpt-3.5-turbo,gpt-4o-mini) - Select one or more datasets of type Prompt → Completion with status Ready
Make sure your selected datasets are relevant to your use case – combining unrelated sources may dilute the model’s focus and reduce effectiveness.
When everything is set, use the buttons at the bottom to:
- Run training – starts the fine-tuning process
- Back – returns to the model overview without saving changes
The training process may take some time depending on the size of your dataset and current OpenAI queue status. You can monitor progress via the Status column.
Using Fine-Tuned Models in Real-World Scenarios
Once a model is ready, it becomes available across all AIWU AI Copilot features where OpenAI models are used including content generation, chatbots, and dynamic FAQs.
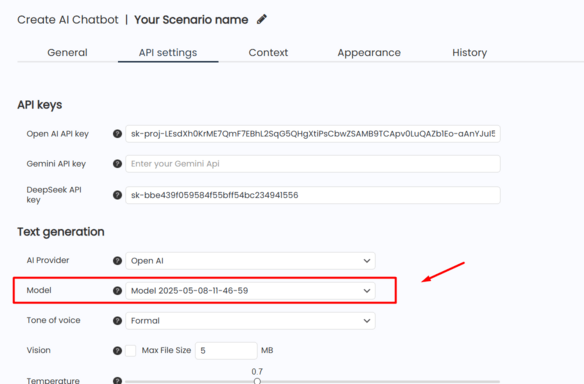
To use it:
- Open any AIWU interface that lets you choose a model
- In the model selection dropdown, you’ll find your custom model listed alongside standard OpenAI options
- Select it, and the system will generate output using your trained model instead of the default one
This integration makes it easy to deploy your custom AI wherever needed from automated customer support to personalized content creation.
Why Fine-Tuning Matters
While general-purpose AI models are powerful out of the box, they often lack the specificity required for business-critical applications. Fine-tuning addresses this gap by:
- Improving accuracy and relevance through domain-specific training
- Ensuring consistency in tone, terminology, and branding
- Reducing reliance on post-processing rules or manual edits
- Giving you control over what the model knows and how it behaves
With AIWU AI Copilot, you don’t need machine learning expertise to benefit from these advantages. Just prepare quality data, train your model, and let your AI work exactly the way your audience expects.
Embeddings: Teaching Your AI to Understand Context
If fine-tuning helps your AI speak like your brand, embeddings help it think like someone who really knows your business. They’re the backbone of contextual understanding in modern AI systems and with AIWU AI Copilot, you can create and manage them directly from your WordPress dashboard.
In simple terms, an embedding is a numerical representation of text that captures its meaning. By converting your content into these mathematical vectors, your AI can understand semantic relationships not just keywords. This makes embeddings essential for tasks like:
- Building knowledge-aware chatbots
- Powering search engines that return relevant results, not just matching words
- Enabling Retrieval-Augmented Generation (RAG) for more accurate, data-backed responses
Let’s dive into how you can use this powerful feature in AIWU AI Copilot.
Managing Embedding Collections
The Embeddings tab is where you create, update, test, and connect your embedding collections to AI profiles. It gives you full control over the vector databases where your embeddings are stored and used.
Here, you’ll find a list of all your existing embedding collections, each showing:
- ID: A unique identifier assigned by the system
- Name: A user-defined label that helps you organize different collections
- Dataset: The source dataset used to generate the embeddings – must be of type Raw Text
- Chunks: How many text segments were processed during embedding generation
- Model: The embedding model used (e.g.,
text-embedding-3-small) - Status: Whether the collection is:
- Ready – fully built and ready for use
- Processing – currently being generated
- Error – something went wrong during processing
- Vector DB: Which external database stores the vectors (currently limited to Pinecone and Qdrant, chosen for their simplicity and performance)
- Actions:
- View – inspect the individual chunks and verify structure
- Delete – remove outdated or unused collections
You can also select multiple collections and delete them at once using the top Delete button handy when cleaning up after testing or iterations.
How Embeddings Are Created
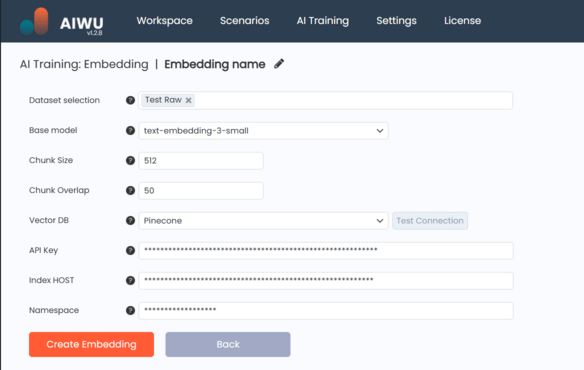
Creating an embedding collection is a straightforward process, but it’s backed by powerful technology under the hood. Here’s what happens when you click Create Embedding:
- You select one or more datasets of type Raw Text (must have status Ready or In Use).
- You choose an embedding model – typically
text-embedding-3-smallfor most use cases. - You define how the system should split your text into chunks (default: 512 tokens per chunk).
- Optionally, you set chunk overlap (default: 50 tokens) to preserve context between adjacent pieces.
- You pick a vector database – Pinecone or Qdrant and enter connection details.
Then, the system processes your data:
- Splits the text into chunks
- Sends each to the selected embedding model
- Receives numeric vectors representing the meaning of each piece
- Stores those vectors in the chosen vector database
Once complete, your AI can instantly retrieve and use this deep contextual knowledge during content generation, chatbot interactions, and more.
Choosing the Right Embedding Model
AIWU AI Copilot supports several OpenAI embedding models. Each has trade-offs between accuracy, cost, and compatibility:
| Model | Max Input Tokens | Dimensions | Status | Notes |
|---|---|---|---|---|
text-embedding-3-small | 8191 | 1536 | ✅ Current | Recommended for most tasks balances quality and cost |
text-embedding-3-large | 8191 | 3072 | ✅ Current | More precise but more expensive ideal for complex domains |
text-embedding-ada-002 | 8191 | 1536 | ⚠️ Legacy | Still functional, but no longer recommended for new projects |
Unless you’re working on high-stakes applications like legal or medical documentation, text-embedding-3-small is usually the best choice.
Configuring Chunking Strategy
Chunking determines how your text is split before being turned into embeddings. Two key parameters influence this:
- Chunk Size (default: 512 tokens): Controls how much text goes into each chunk. Larger chunks preserve more context but may reduce retrieval precision.
- Chunk Overlap (default: 50 tokens): Defines how much text overlaps between consecutive chunks. Helps maintain continuity across boundaries.
These settings let you balance context preservation with search efficiency depending on your use case.
Connecting to a Vector Database
AIWU AI Copilot currently supports two leading vector databases:
Pinecone
A fully managed service known for ease of use and scalability. When selecting Pinecone, you’ll need:
- API Key (required)
- Index Name (required)
- Namespace (optional)
Qdrant
A fast, open-source alternative with strong performance. When choosing Qdrant, provide:
- API URL (required)
- API Key (optional, if authentication is enabled)
- Collection Name (required)
Before finalizing, you can click Test Connection to ensure credentials are valid and the system can communicate with the database.
Inspecting Chunks with the “View” Feature
To better understand how your data was processed, use the View action. It opens a popup showing the actual chunks extracted from your dataset:
Each row includes:
- Chunk Number
- Text Fragment
- Token Count
- Embedding ID
This transparency lets you verify that the system captured the right information and structured it correctly.
Using Embeddings in Real-World Scenarios
Once created, your embeddings become immediately available wherever AIWU AI Copilot uses external knowledge including:
- Chatbots that answer questions based on internal documentation
- Content generators that pull from your company’s expertise
- Dynamic FAQs that adapt to your latest product updates
Behind the scenes, AIWU uses a technique called Retrieval-Augmented Generation (RAG):
- When generating a response, the system first searches the embedding database for relevant chunks.
- It then injects those chunks into the prompt as context.
- Finally, the language model generates a response based on both the query and the retrieved knowledge.
This ensures your AI doesn’t rely solely on what it was pre-trained on it uses your data to deliver more accurate, timely answers.
Why Embeddings Matter
While general-purpose AI models are smart, they often lack the depth needed for specialized applications. Embeddings bridge that gap by:
- Giving your AI access to proprietary or internal knowledge
- Improving response relevance through semantic search
- Reducing hallucinations by grounding output in real data
- Making your AI feel more like a domain expert than a generic assistant
With AIWU AI Copilot, you don’t need a PhD in machine learning to benefit from this technology. Just prepare your data, configure your embedding settings, and let your AI tap into the full power of your content.
Building Smarter AI Starts with the Right Tools
Creating a truly intelligent, brand-aligned AI assistant used to require deep technical knowledge and access to complex infrastructure. But with AIWU AI Copilot , that’s no longer the case. Now, anyone with WordPress can train custom models, generate semantic embeddings, and build chatbots that understand their business all without writing a single line of code.
Through this guide, we’ve explored how to:
- Create datasets from manual input, files, or existing site content
- Choose the right format and structure for your training data
- Train fine-tuned models that reflect your brand voice and domain expertise
- Build embedding collections that teach your AI to understand context and retrieve relevant information
- Connect everything into real-world applications like chatbots, content generation, and dynamic FAQs
Each step brings you closer to an AI system that doesn’t just repeat generic answers it knows your products, understands your tone, and speaks the language of your customers.
Of course, building effective AI is still a craft as much as a science. It requires thoughtful data preparation, iterative testing, and a willingness to refine your approach. But with AIWU AI Copilot, you’re not left in the dark you have a clear interface, smart defaults, and powerful tools at your fingertips.
Whether you’re building a customer support bot, automating content creation, or enhancing search and recommendations, the foundation is the same: high-quality data + smart configuration = smarter AI.
And that’s what makes AIWU AI Copilot more than just a plugin it’s your gateway to creating AI that works exactly the way your audience expects.