How to Use Webhooks in AIWU Workflows
Introduction
Webhooks enable real-time communication between your WordPress site and external services. With AIWU, you can send data from WordPress to third-party applications and receive data from external sources to trigger automated workflows.
What you’ll learn:
- How to send data from WordPress using Send Webhook
- How to receive data from external services using Webhook Trigger
- How to configure webhooks with proper authentication and data formats
What problems do webhooks solve?
- Automatically sync data between WordPress and external tools (Google Sheets, CRMs)
- Trigger WordPress workflows from external events (form submissions, notifications)
- Create real-time integrations without complex API development
Part 1: Send Webhook – Sync Products to Google Sheets
Use Case
Scenario: When you create a new product in WordPress, automatically add it to a Google Sheets spreadsheet for inventory tracking.
Workflow steps:
- Create a new product in WordPress
- Send product data to Google Sheets via webhook
Step 1: Create Your Workflow
- Go to AIWU → Workflows in your WordPress admin
- Click “Add New Workflow”
- Add your desired trigger (e.g., scheduled trigger, manual trigger)
Step 2: Add Create Product Action
- Click the “+” button to add an action node
- Select “Create Product” from WordPress Actions
- Configure your product:
- Product title
- Description
- Price
- Categories
- Status
This action creates variables you’ll use in the webhook:
{{node#2.prod_id}}– Product ID{{node#2.prod_name}}– Product name{{node#2.prod_price}}– Product price{{node#2.prod_status}}– Product status{{node#2.prod_desc}}– Product description{{node#2.prod_categories}}– Product categories
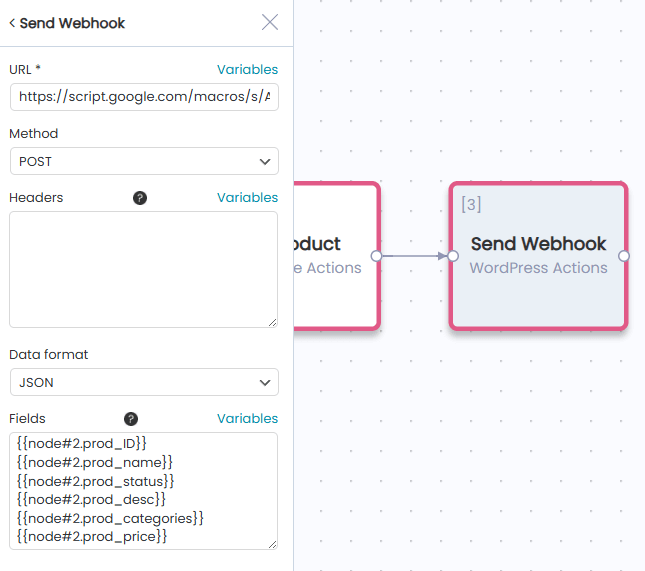
Step 3: Add Send Webhook Action
- Click the “+” button after Create Product
- Select “Send Webhook” from WordPress Actions
- Configure the webhook settings
Step 4: Configure Send Webhook
URL
Enter your Google Sheets webhook URL (from Google Apps Script):
https://script.google.com/macros/s/YOUR_SCRIPT_ID/exec
Tip: You can use variables in URLs for dynamic endpoints.
Method
Select the HTTP method:
- POST – Recommended for sending data
- GET – For simple requests
- PUT – For updates
- PATCH – For partial updates
- DELETE – For deletions
For Google Sheets: Select POST
Headers (Optional)
Add authentication or custom headers. Each header on a new line:
Header-Name: Header-Value
Examples:
x-api-key: your-api-key-here
Authorization: Bearer your-token
Content-Type: application/json
For Google Sheets: Usually not required.
Data Format
Select how to structure your data:
- JSON – Most common, works with most APIs
- XML – For legacy systems
- x-www-form-urlencoded – Standard form encoding
- form-data – For file uploads
- TEXT – Plain text
- HTML – HTML content
For Google Sheets: Select JSON
Fields
Define what data to send. Each field on a new line in format key: value.
For nested data, use forward slashes (/):
Simple example:
{{node#2.prod_id}}
{{node#2.prod_name}}
{{node#2.prod_price}}
{{node#2.prod_status}}
{{node#2.prod_desc}}
{{node#2.prod_categories}}
With nested structure:
product/id: {{node#2.prod_id}}
product/name: {{node#2.prod_name}}
product/price: {{node#2.prod_price}}
product/status: {{node#2.prod_status}}
product/description: {{node#2.prod_desc}}
product/categories: {{node#2.prod_categories}}
This creates JSON:
{
  "product": {
    "id": "123",
    "name": "Wireless Headphones",
    "price": "99.99",
    "status": "publish",
    "description": "High-quality wireless headphones",
    "categories": "Electronics, Audio"
  }
}
Step 5: Using Variables
Click the “Variables” button to browse and insert variables from previous nodes.
Available response variables (for use in next nodes):
{{node#3.webhook_code}}– HTTP response code (200 = success){{node#3.webhook_error}}– Error message if failed{{node#3.webhook_field[key]}}– Field values sent{{node#3.webhook_result[key]}}– Response data from service
Step 6: Save and Run
- Click “Save” to save your workflow
- Click “Run” to activate
- Check Google Sheets to verify data was received
Part 2: Webhook Trigger – Process Customer Surveys with AI
Use Case
Scenario: When a customer submits a survey form on your website, automatically process the response with AI and send a summary to your team’s Telegram channel.
Workflow steps:
- Webhook Trigger – Receives survey data
- Open AI Generate Text – Analyzes the response
- Send Message (Telegram) – Notifies your team
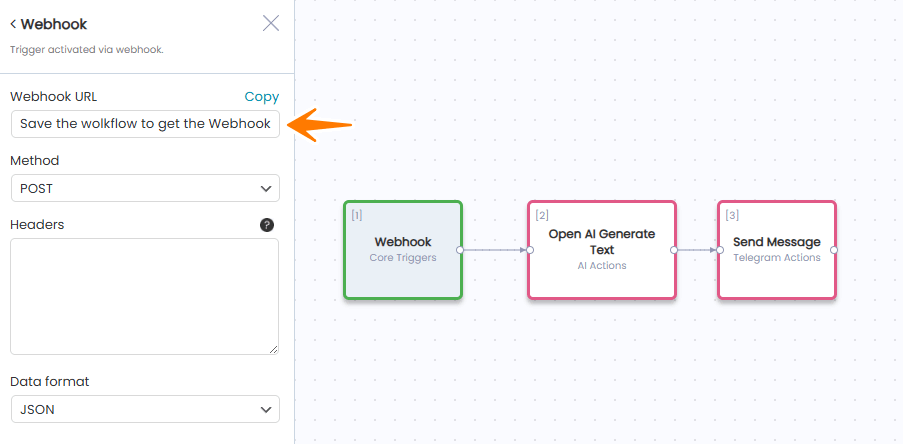
Step 1: Create Workflow with Webhook Trigger
- Go to AIWU → Workflows
- Click “Add New Workflow”
- Name it (e.g., “Customer Survey Processor”)
- Click “Add Trigger”
- Select “Webhook” from Core Triggers
Step 2: Get Your Webhook URL
Important: Save the workflow first to generate the URL.
- Click “Save” button
- Reopen the Webhook trigger node
- Copy the generated URL:
https://yoursite.com/wp-json/aiwu/v1/webhook/{task_id}_{node_id}/
How to use:
- Give this URL to the external service that will send data
- Each workflow has a unique webhook URL
- The URL is secure and tied to this specific workflow
Step 3: Configure Webhook Settings
Method
Select which HTTP method to accept:
- POST – Recommended for receiving data
- GET – For simple requests
- PUT – For updates
For forms: Select POST
Headers (Optional – Recommended for Security)
Add authentication headers. Each on a new line:
Header-Name: Expected-Value
Example:
x-api-key: your-secret-key-123456
Authorization: Bearer your-token
How it works:
- External service must send these exact headers
- If headers don’t match, webhook is rejected
- Leave empty if no authentication needed (not recommended)
Data Format
Specify the incoming data format:
- AUTO – Automatic detection (recommended)
- JSON – Most common for APIs
- XML – Legacy systems
- x-www-form-urlencoded – HTML forms
- form-data – Multipart forms
For web forms: Select JSON or AUTO
Step 4: Understanding Webhook Variables
When webhook receives data, AIWU creates variables for use in your workflow.
Standard variables:
{{node#1.date}}– Date received (YYYY-MM-DD){{node#1.time}}– Time received (HH:MM:SS){{node#1.webhook_field[key]}}– Data fields
Example: If webhook receives:
{
  "name": "John Doe",
  "email": "[email protected]",
  "feedback": "Great service!",
  "rating": 5
}
Available variables:
{{node#1.webhook_field[name]}}=John Doe{{node#1.webhook_field[email]}}=[email protected]{{node#1.webhook_field[feedback]}}=Great service!{{node#1.webhook_field[rating]}}=5
Working with Nested Data
For nested JSON:
{
  "customer": {
    "name": "John Doe",
    "address": {
      "city": "New York"
    }
  }
}
Access with:
{{node#1.webhook_field[customer/name]}}=John Doe{{node#1.webhook_field[customer/address/city]}}=New York
Pattern: Use forward slashes (/) to access nested keys.
Step 5: Add AI Processing
- Click “+” after Webhook trigger
- Select “Open AI Generate Text”
- Configure AI prompt with webhook variables:
Analyze this customer survey and provide insights:

Customer: {{node#1.webhook_field[name]}}
Email: {{node#1.webhook_field[email]}}
Rating: {{node#1.webhook_field[rating]}}/5
Feedback: {{node#1.webhook_field[feedback]}}

Provide:
1. Sentiment (Positive/Neutral/Negative)
2. Key themes
3. Suggested actions
This creates: {{node#2.ai_result}} – AI analysis
Step 6: Add Telegram Notification
- Click “+” after AI action
- Select “Send Message” from Telegram Actions
- Configure message with variables:
New Customer Survey

Customer: {{node#1.webhook_field[name]}}
Email: {{node#1.webhook_field[email]}}
Rating: {{node#1.webhook_field[rating]}}/5

Feedback:
{{node#1.webhook_field[feedback]}}

AI Analysis:
{{node#2.ai_result}}

Received: {{node#1.date}} at {{node#1.time}}
Step 7: Activate Workflow
- Click “Save”
- Toggle workflow to “Active” status
- Your webhook is now live and listening!
Security Best Practices
1. Use Header Authentication
Always configure headers in Webhook Trigger:
x-api-key: generate-a-long-random-key-here
Generate secure keys:
- Minimum 32 characters
- Mix letters, numbers, symbols
- Use a password generator
2. Use HTTPS Only
- Ensure your WordPress site uses HTTPS
- Never send sensitive data over HTTP
- Webhook URLs should start with
https://
3. Validate Incoming Data
Add Condition nodes to check required fields:
If {{node#1.webhook_field[email]}} is empty
Then: Stop workflow
4. Store Credentials Securely
Never hardcode sensitive data:
Bad:
Headers: api-key: sk_live_1234567890
✓ Good:
Store in WordPress settings
Use variables: {{api_key_setting}}
Common Use Cases
Send Webhook
- Sync data to Google Sheets, Airtable
- Send notifications to Slack, Discord
- Update CRM records (HubSpot, Salesforce)
- Trigger external automations (Zapier, Make.com)
- Log events to analytics platforms
Webhook Trigger
- Process form submissions
- Receive payment notifications
- Handle survey responses
- Get updates from external systems
- Connect with third-party services
Summary
Send Webhook:
- Sends data from WordPress to external services
- Supports POST, GET, PUT, PATCH, DELETE methods
- Multiple formats: JSON, XML, form-data, TEXT, HTML
- Use variables to send dynamic data
Webhook Trigger:
- Receives data from external services
- Each workflow gets unique URL (save workflow first!)
- Supports authentication via headers
- Automatically creates variables from incoming data
Key Points:
- Always use HTTPS
- Authenticate webhooks with headers
- Use JSON format when possible
- Test thoroughly before production
- Monitor workflow execution logs