How to Train a Custom AI Chatbot for WooCommerce — Step-by-Step Guide
Sarah runs a WooCommerce pet supply store with 200 products. Every day, her customers ask the same questions: “What food is best for a senior Labrador?”, “Do you ship to Canada?”, “What’s your return policy?” She wants a chatbot that actually knows her products and policies — not one that gives generic GPT answers about pet care in general.
This guide walks you through training a custom AI chatbot for a WooCommerce store — from zero to a working assistant that recommends real products with real prices. The whole process takes about 30 minutes and costs under $5.
Before You Start
To follow this tutorial, you’ll need AIWU Pro installed and activated, an OpenAI API key configured in the plugin settings, and a free-tier account on Pinecone or Qdrant (vector database for embeddings). If you haven’t set these up yet, start with the Set Up Your First AI Chatbot in 5 Minutes guide, then come back here.
How It All Fits Together
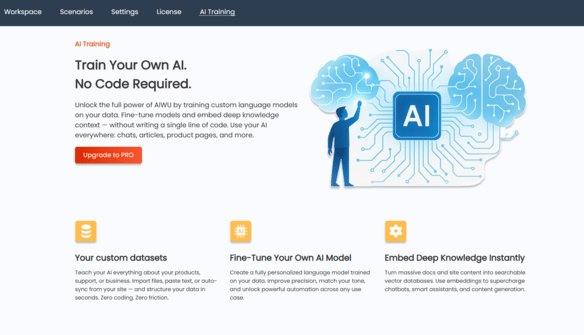
AIWU offers two ways to teach your chatbot — and they solve different problems. Embeddings give the chatbot knowledge: your product catalog, policies, FAQ pages. Fine-tuning teaches it a voice: how to greet customers, what tone to use, how to structure recommendations. Most stores need embeddings. Fine-tuning is optional but powerful when you want consistent brand personality.
| Embeddings | Fine-Tuning | |
|---|---|---|
| Best for | Product catalog, FAQ content, policies | Brand voice, response style, tone |
| Data format | Raw text (descriptions, docs) | Q&A pairs (prompt → completion) |
| Updates | Add new content anytime (cheap) | Requires retraining each time |
| Typical cost | Under $0.01 for most stores | $1–$8 per training run |
| Sarah’s use | Product knowledge + shipping FAQ | Friendly, helpful pet expert tone |
Not sure which method is right for you? Read the detailed Fine-Tuning vs Embeddings: Which Training Method Should I Use? guide.
The Result: Before vs After
Before we dive into the steps, here’s what changes once your chatbot is trained. This is the difference between a generic AI and one that knows your store:
Before training (generic GPT):
User: What food do you recommend for my 10-year-old Labrador?
Bot: Senior dogs generally benefit from food with lower calories and joint support supplements. Look for brands with glucosamine and chondroitin.
After training (with embeddings from Sarah’s store):
User: What food do you recommend for my 10-year-old Labrador?
Bot: For a senior Labrador, I’d recommend our Royal Canin Labrador Senior ($52.99) — it’s specifically formulated for Labs 8+ with joint support and L-carnitine for healthy weight. We also carry Hill’s Science Diet Senior Large Breed ($48.99) if you prefer grain-inclusive. Both are in stock and ship free on orders over $50!
That’s the difference: real products, real prices, real value for your customer. Let’s build this.
Step 1: Create Your Dataset
Everything starts with data. For Sarah’s pet store, we’ll pull product information directly from WooCommerce — no file uploads or copy-pasting needed.
Navigate to AIWU → AI Training. You’ll find this either in the plugin header tab or in the WordPress sidebar menu — both lead to the same place.

Click Create New on the Datasets screen and select Site Content as the source. This is the fastest way to get WooCommerce data into a training dataset.
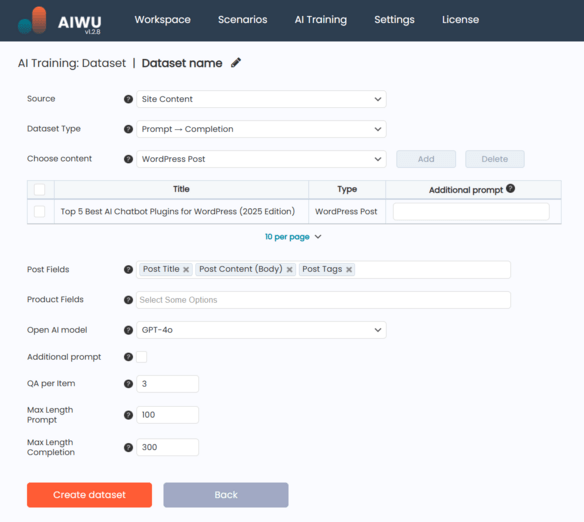
Here’s what to configure for a WooCommerce store like Sarah’s:
- Content Type: WooCommerce Products
- Select products: Click Add and pick the products you want the chatbot to know about. For Sarah, that’s all 200 pet supplies.
- Fields to include: Product Name, Description, Short Description, Price, Categories, Attributes, Stock Status. The more fields you select, the smarter your chatbot’s answers will be.
- Dataset Type: Raw Text (this is what we need for embeddings)
- Additional Prompt: “Organize this product information so it can be used to answer customer questions about pet supplies, including recommendations, pricing, and availability.”
Click Create Dataset. The system will process each product and generate a clean text dataset. Wait for the status to show Ready — this usually takes a few minutes depending on product count.
You can also create datasets by uploading files (CSV, JSON, TXT, PDF, DOCX) or by typing text manually. For the complete reference on all three methods, see How to Create and Manage Datasets.
Step 2: Create Embeddings (Product Knowledge)
Now we turn Sarah’s product data into something the AI can actually search and understand. Embeddings convert text into mathematical vectors that capture meaning — so when a customer asks about “senior dog food,” the system finds products related to senior nutrition, not just ones with the word “senior” in the title.
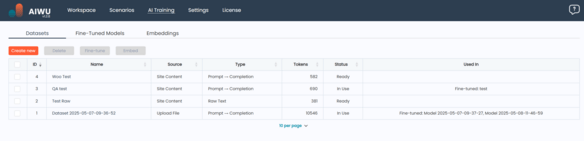
On the Datasets screen, find your Ready dataset and click Embed. This opens the embedding configuration screen.
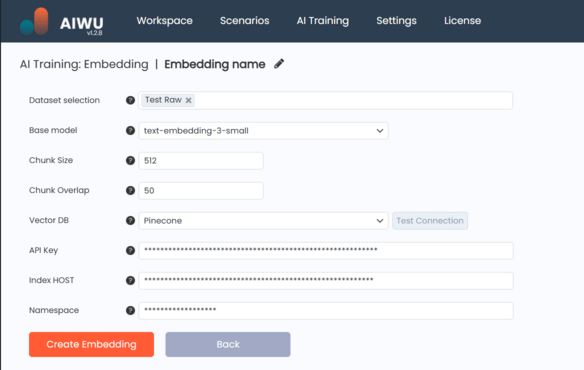
Configure these settings:
- Embedding Model:
text-embedding-3-small— best balance of quality and cost for most stores - Chunk Size: 512 tokens (default — works well for product descriptions)
- Chunk Overlap: 50 tokens (preserves context between chunks)
- Vector Database: Select Pinecone or Qdrant and enter your connection details
| Model | Dimensions | Best For |
|---|---|---|
text-embedding-3-small | 1536 | Most use cases — recommended |
text-embedding-3-large | 3072 | Complex domains (legal, medical) |
text-embedding-ada-002 | 1536 | Legacy — not recommended for new projects |
Click Test Connection to verify your vector database credentials, then click Create. The system splits your text into chunks, sends each to the embedding model, and stores the resulting vectors in your database. For 200 products, this typically completes in a few minutes.
Once the status shows Ready, use the View button to inspect individual chunks and verify the data looks correct.
For detailed vector database setup, see Connecting Pinecone or Setting Up Qdrant. For the full embedding reference, see How to Create and Use Embeddings.
Step 3 (Optional): Fine-Tune a Model (Brand Voice)
Embeddings give your chatbot knowledge. Fine-tuning gives it personality. This step is optional — many stores get great results with embeddings alone. But if you want consistent brand voice (friendly pet expert, formal consultant, casual helper), fine-tuning is the way to do it.
For fine-tuning, you need a separate dataset with a different structure: Prompt → Completion pairs. Each pair teaches the model how you want it to respond. Create a new dataset and select Text Input as the source, then choose Prompt → Completion as the type.
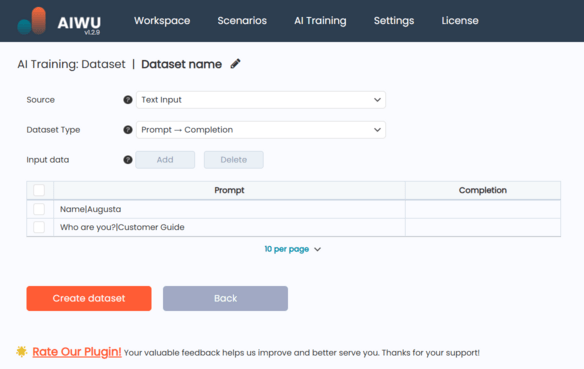
Here are example Q&A pairs for Sarah’s pet store (you’ll want at least 10–20 pairs, ideally 50+):
What are your store hours? : We're open Monday through Saturday, 9 AM to 7 PM, and Sunday 10 AM to 5 PM. You can also shop online 24/7!
Do you price match? : Absolutely! If you find a lower price at a local competitor, bring in proof and we'll match it. Online-only retailers are excluded.
Can I return opened pet food? : Yes, within 14 days of purchase. If your pet didn't like it, we'll exchange it or give you store credit — no questions asked.
Do you have a loyalty program? : Yes! Our Paw Points program gives you 1 point per dollar. Once you hit 100 points, you get $5 off your next purchase.
What brands do you carry for cats? : We carry Royal Canin, Hill's Science Diet, Blue Buffalo, Purina Pro Plan, and several local artisan brands. Let me know your cat's age and any dietary needs — I'll find the perfect match!
Notice the consistent tone: friendly, helpful, and specific. This is what the model learns to replicate.
Once your dataset is Ready, go to the Fine-Tuned Models tab and click Create New. Select gpt-4o-mini as the base model (best cost-to-quality ratio) and pick your Prompt → Completion dataset. Click Run Training.
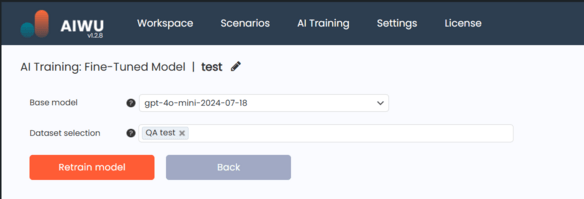
Training takes anywhere from 5 minutes to an hour depending on dataset size and OpenAI’s queue. You can monitor the status — once it shows Ready, use the Test button to chat with your model and verify it responds in the right voice.
For a deeper dive into fine-tuning options and best practices, see Fine-Tuning: How to Train Your Own Custom AI Model and Best Practices for Datasets.
Step 4: Connect Everything to Your Chatbot
You have product knowledge (embeddings) and optionally a brand voice (fine-tuned model). Now connect them to a live chatbot.
- Go to AIWU → Apps → AI ChatBot and select your chatbot (or create one if you haven’t yet).
- In Context Settings, connect your embedding collection. This is what gives the chatbot access to your product knowledge.
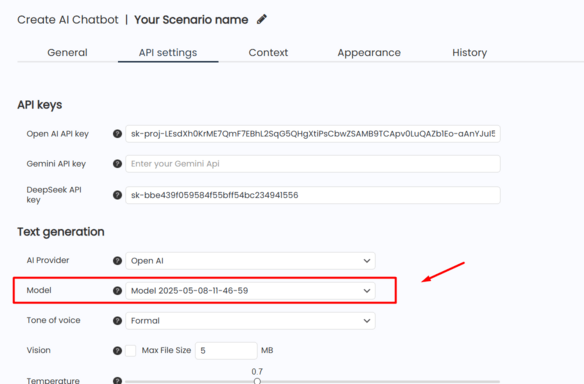
- In API Settings, select your fine-tuned model from the dropdown (it appears alongside standard OpenAI models). If you skipped Step 3, keep the default model — the embeddings alone will still make a huge difference.
- Save and test. Ask a product-specific question and verify you get a real answer with real product data.
For a step-by-step guide on connecting embeddings to a chatbot, see Train Your Chatbot with Embeddings. For WooCommerce-specific product recommendation setup, see WooCommerce Product Recommendations in AI Chatbot.
What It Costs: Complete Breakdown
Here’s what Sarah’s training scenario actually costs with OpenAI’s API pricing:
| What | Model | Tokens | Estimated Cost |
|---|---|---|---|
| Embeddings (200 products) | text-embedding-3-small | ~100K | ~$0.002 |
| Embeddings (200 products + 50 FAQ pages) | text-embedding-3-small | ~250K | ~$0.005 |
| Fine-tuning (100 Q&A pairs, 4 epochs) | gpt-4o-mini | ~310K training tokens | ~$0.93 |
| Fine-tuning (100 Q&A pairs, 4 epochs) | gpt-4o | ~310K training tokens | ~$7.75 |
| Ongoing: each chatbot message | gpt-4o-mini (fine-tuned) | ~800 tokens avg | ~$0.001 |
| Pinecone (free tier) | — | Up to 100K vectors | $0/month |
| Qdrant Cloud (free tier) | — | Up to 1GB | $0/month |
Bottom line: Training a chatbot for a WooCommerce store with 200 products costs under $5 total. Each customer interaction costs fractions of a cent. Even for a store handling 1,000 chatbot conversations per month, the ongoing API cost stays under $1.
⚠️ AI pricing changes frequently. The estimates above are provided as a general reference — always check the OpenAI Pricing page for current rates before budgeting.
Troubleshooting
Three most common issues and how to fix them:
Dataset shows “Invalid” status. This usually means a file encoding problem. Re-save your file as UTF-8, remove empty rows or malformed entries, and make sure CSV columns match properly. Re-upload and try again.
Fine-tuning job shows “Failed.” Most common cause: the dataset has fewer than 10 prompt-completion pairs. OpenAI requires a minimum amount of training data. Add more examples and retry. Also check that your OpenAI account has sufficient credit.
Chatbot doesn’t use the trained knowledge. The embeddings were created, but they’re not connected to the chatbot. Go to your chatbot’s Context Settings and verify the embedding collection is selected and its status is “Ready.” Also confirm the vector database connection is active.
For more help, see AI Not Responding? Quick Troubleshooting Guide.
What’s Next
Your chatbot is trained and working. Here’s how to keep improving it:
Add more content over time. When you add new products or update policies, create a new dataset and re-embed. It takes minutes and costs pennies.
Refine your fine-tuning. Look at real customer conversations (via Chatbot Analytics) and add good Q&A pairs as training examples. Each iteration makes the chatbot smarter.
Explore advanced scenarios. Build a full Customer Support Chatbot that handles 80% of tickets automatically, or set up Multi-Language detection for international stores.
Related Guides
- How to Create and Manage Datasets — full dataset reference (all three methods)
- How to Create and Use Embeddings — deep dive into embedding configuration
- Fine-Tuning: How to Train Your Own Custom AI Model — full fine-tuning reference
- Fine-Tuning vs Embeddings: Which Should I Use? — decision guide
- Best Practices for Datasets — data quality tips
- WooCommerce Product Recommendations — product search methods