Triggers in Workflow Builder: The Smart Way to Automate WordPress
Automation doesn’t start with actions it starts with awareness.
Your workflow needs to know when something happens: a new order, a published post, a returning customer. That “when” is your trigger the heartbeat of every automation in AI Copilot Workflow Builder.

Think of triggers as your site’s nervous system. They sense changes and instantly respond without you lifting a finger. But not all triggers are equal. Choose the wrong one, and your automation becomes slow, noisy, or even counterproductive. Choose the right one, and your WordPress site runs like a well-oiled machine.
In this guide, we’ll walk you through the eight trigger types not as a dry list, but as practical tools for real business problems. You’ll learn exactly when to use each, and how to build workflows that feel intelligent, not intrusive.
The Three Families of Triggers and Why This Matters
Workflow Builder organizes triggers into three intuitive groups that mirror how WordPress actually works:
- Universal triggers for tasks you control directly or schedule.
- WordPress-native triggers that respond to content and users.
- WooCommerce-specific triggers built for e-commerce logic.

This structure isn’t arbitrary it reflects the architecture of WordPress itself. Unlike external tools that treat your site as a black box, Workflow Builder speaks WordPress natively. That means triggers fire instantly, reliably, and with full access to your data no REST API limitations, no missing ACF fields, no delayed webhooks.
This distinction is critical. When your automation lives inside WordPress, it doesn’t just react it understands.
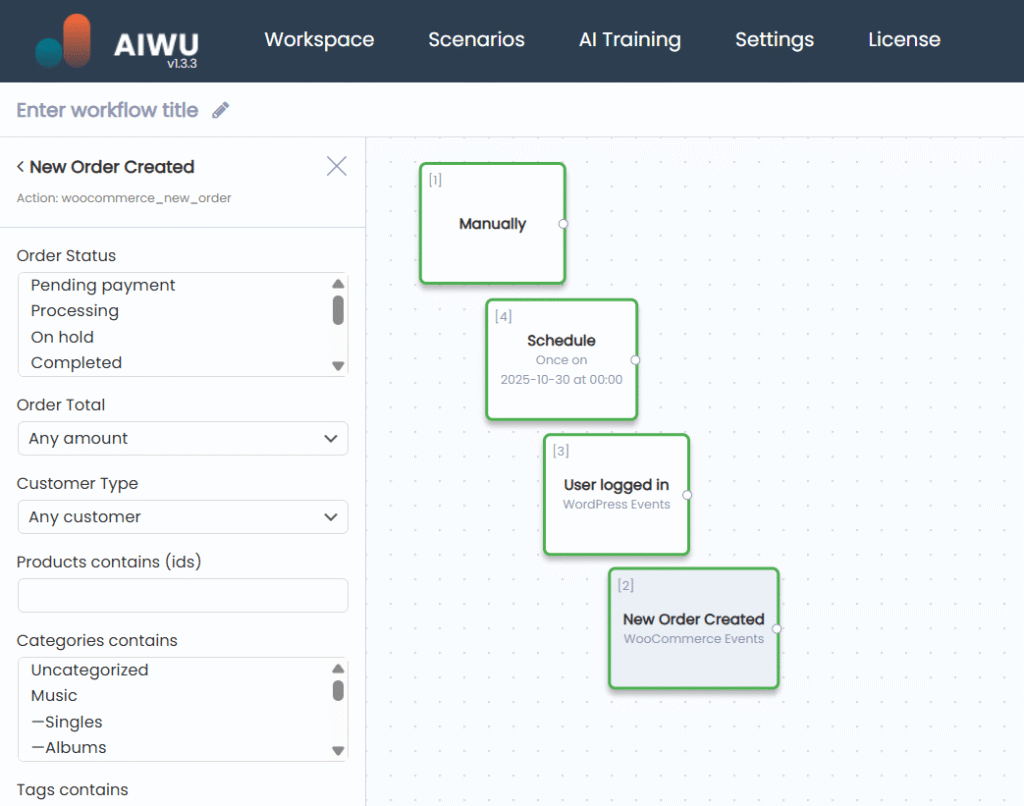
Manual & Schedule: Your On-Demand and Clockwork Helpers
Sometimes, you don’t need an event you need control. That’s where Manual and Schedule triggers shine.
The Manual Trigger is perfect for one-off bulk operations. Imagine you’ve just migrated 300 products, and none have featured images. With one click, you can loop through all of them, generate unique visuals with DALL·E, and assign them no coding, no plugins. It’s also ideal for testing: run a workflow on a single post first, verify the result, then scale to your entire site.
But here’s what many miss: Manual isn’t just for cleanup it’s your safety net. Because it requires human initiation, it’s the only trigger that guarantees you’re in the loop. Use it for high-stakes operations like mass user role changes, financial data updates, or irreversible content transformations. You’ll sleep better knowing nothing happened by accident.
The Schedule Trigger, on the other hand, turns your site into a silent night-shift worker. Set it to run every morning at 9 a.m. to publish a draft, or every night at 3 a.m. to optimize new posts with AI-generated meta descriptions. Just remember: WordPress cron relies on site visits, so for mission-critical timing, pair it with a system-level cron job.
There’s a subtle art to scheduling: align it with your audience’s behavior. Publishing at 9 a.m. local time? Great for blogs. Running heavy AI tasks at 3 a.m.? Perfect when traffic is low and server load is minimal. Scheduling isn’t just about automation it’s about strategic timing.
Content Triggers: Post Created vs. Post Updated
When your site creates or changes content, these two triggers respond but in very different ways.
Post Created fires only once: the moment a new post is saved (not during autosaves). This makes it ideal for initial setup tasks like generating an SEO meta description, creating a featured image, or publishing a draft after AI enhancement. Because it runs just once, it’s clean, efficient, and safe from duplication.
But here’s a pro insight: Post Created is your best friend for content pipelines. Many teams use it to build a “draft-to-publish” assembly line: writer saves draft → AI enhances → image generated → post published. This creates a repeatable, scalable content engine that doesn’t rely on human memory or manual steps.
Post Updated, by contrast, activates every time a post is edited. That includes every “Ctrl+S” in the editor so without careful filtering, it can flood your system. But used wisely, it’s powerful. For example, you can detect when an editor changes a post’s status from “pending” to “draft” and automatically publish it with AI enhancements. Or monitor key pages and back up every change to a private archive.
The key? Always combine Post Updated with precise filters like old vs. new status or add a cooldown period so it doesn’t fire repeatedly in a short window. And never, ever create a workflow that updates a post and then triggers another update on the same post infinite loops are real, and they can bring your site to its knees.
User Triggers: Welcome Newcomers, Re-Engage Returners
People are at the heart of your site and Workflow Builder treats them that way.
When someone registers, the User Registered trigger lets you start a relationship the right way. Send a personalized welcome email using their name, assign loyalty points, or even detect corporate email domains to auto-enroll VIPs. Because registration happens once, this trigger is safe to use without cooldowns.
But what about users who come back? That’s where User Logged In comes in. This trigger is powerful but noisy. It fires every time someone logs in, so without safeguards, it could spam your customers. The solution: always enable a 24-hour cooldown in your workflow settings. With that in place, you can safely check for abandoned carts, send re-engagement offers, or deliver personalized recommendations based on past behavior.
One often-overlooked nuance: User Logged In works for both registered users and WooCommerce customers who log in via “My Account.” That means you can trigger post-purchase nurturing sequences the moment a buyer returns to check their order status creating a seamless, human-like experience without a single line of code.
WooCommerce Triggers: Automate the Customer Journey
For store owners, New Order and Order Status Changed are game-changers.
New Order responds the moment a purchase is made. You can instantly thank the customer, notify your team about a high-value sale, or generate a custom invoice all before the buyer even leaves the thank-you page. Filter by order total, product category, or customer type (first-time vs. returning) to tailor the experience.
But the real magic happens with Order Status Changed. This trigger tracks the entire lifecycle of an order. When a status shifts from “processing” to “completed,” wait a day, then ask for a review. If an order is canceled, send a gentle message asking why and offer a discount to win them back. If it’s stuck in “on-hold,” remind the customer after 24 hours.
Unlike generic automation tools, Workflow Builder understands WooCommerce’s internal logic. It knows what “first-time customer” means (it checks historical order data). It sees custom fields. It works with your existing setup no API wrappers, no webhooks, no latency.
And because it runs inside WordPress, it respects your business logic. If you use a plugin that adds custom order statuses, Workflow Builder sees them. If you’ve extended user roles, it recognizes them. This isn’t integration it’s native fluency.
Why Native Triggers Beat External Tools Architecturally
Platforms like Zapier or n8n treat WordPress as just another app in a chain. They rely on REST APIs, webhooks, and public endpoints which means delays, data exposure, and limited access to custom fields.
Workflow Builder lives inside WordPress. Its triggers hook directly into core events like wp_after_insert_post or woocommerce_new_order so they’re instant, secure, and complete. There’s no 2–5 second lag. No need to expose your site to the internet. No missing ACF or WooCommerce metadata.
Consider this: when a new order is placed, WooCommerce fires an internal PHP hook. Workflow Builder listens to that hook in the same request cycle. Zapier, by contrast, must wait for a webhook to be sent, received, processed, and then sent back via another API call. That’s three network round-trips versus zero.
This isn’t just convenient it’s architecturally superior for anyone whose business runs on WordPress. You’re not automating around your site. You’re automating within it.
Pro Tips for Reliable, Scalable Automation
Even the best trigger can misfire without smart design. Here’s how to get it right:
- Always test with Manual first run your workflow on one item before scaling.
- Use cooldowns for frequent triggers like User Logged In or Post Updated.
- Avoid loops that create new posts unless you filter carefully otherwise, you risk infinite cycles.
- Combine triggers with Branch logic for complex conditions that go beyond basic filters.
- Enable email notifications so you’re alerted if something fails.
- Name your workflows clearly “VIP Order Handler” is better than “Workflow #7.”
But perhaps the most important principle: favor simplicity over cleverness. A workflow with three clear steps is better than one with ten nested conditions. It’s easier to debug, easier to explain to your team, and far less likely to break when you update a plugin.
Remember: a great workflow isn’t just powerful it’s predictable, transparent, and maintainable.
Start Small, Think Big
You don’t need to automate everything at once. Start with one high-impact trigger:
- Use Post Created to auto-optimize every new blog post.
- Use New Order to send a VIP thank-you note for big purchases.
- Use Schedule to revive old drafts while you sleep.
Each of these takes less than 10 minutes to set up and pays dividends in time, consistency, and customer experience.
Because in the end, automation isn’t about replacing humans. It’s about freeing them to do what only they can: create, connect, and lead.
